Saturday, 22 October 2016

Dirty COW exploit and Automatic Security Updates

The announcement this week of the Dirty COW (CVE-2016-5195), a privilege escalation vulnerability in the Linux Kernel reminded me to check my Ubuntu systems to ensure I had Automatic Security Updates activated.

This ancient bug has came to light now as, there is code in the wild using the vuneralbility that makes patching the Kernel a necessity. Systems that use the Linux OS need patching. This includes Android devices.

My home server and workstation already had Automatic Security Updates activated but, my Kodi Media Center did not.

I first wanted to check if I had been patched
zgrep -ie "\(CVE-2016-2108\|CVE-2016-2107\)" /usr/share/doc/libssl1.0.0/changelog.Debian.gz

Should respond
Debian
* Fix CVE-2016-2107
* Fix CVE-2016-2108

Ubuntu
- debian/patches/CVE-2016-2107.patch: check that there are enough
- CVE-2016-2107
- debian/patches/CVE-2016-2108-1.patch: don't mishandle zero if it is
- debian/patches/CVE-2016-2108-2.patch: fix ASN1_INTEGER handling in
- CVE-2016-2108

If your Android device prompts you for a System Update, don't ignore it, run it.

Automatic Security Updates
To check if your Debian / Ubuntu system has Automatic Security Updates is installed, you can manually run it with verbose.
sudo apt-get update
sudo unattended-upgrades -v

If this gives an error then, it is not installed so execute
sudo dpkg-reconfigure --priority=low unattended-upgrades

Once installed, check that
cat /etc/apt/apt.conf.d/20auto-upgrades

This should result in
APT::Periodic::Update-Package-Lists "1";
APT::Periodic::Unattended-Upgrade "1";

If not, edit the file and set APT::Periodic::Unattended-Upgrade to "1".

References:
https://dirtycow.ninja/
https://help.ubuntu.com/community/AutomaticSecurityUpdates

Saturday, 25 June 2016

Using sed to search and replace text in files within a directory

I needed to edit all files within a directory, replacing an ip address '10.0.7.52' with 'localhost'.

sed is a very powerful command line tool. All the help web pages look intimidating so, it took me a long time to appreciate and understand the basics of it.

The basic usage is:
sed [options] commands [file-to-edit]


I used:
sed -i -e 's/10\.0\.7\.52/localhost/g' *


-i option is used to edit in place on filename.

-e option indicates a command to run.

s is the command used to replace the found expression "10.0.7.52" with "localhost". The command and the two 'words' are separated by forward slashes.

g stands for "global", meaning to do this for the whole line. If you leave off the g and "10.0.7.52" appears twice on the same line, only the first "10.0.7.52" is changed to "localhost".

The backslashes are to escape the following character (the dot) otherwise, it would be interpreted as wildcard for a single character and not, as a dot in the ip address.

Finally, the asterisk states to run this on all files in the current directory.

Removing columns in a csv file

Sometimes I get supplied a large comma separated (.CSV) file from a client with erroneous data columns (fields) in it. Most people would say, open it in M$ Excel, highlight the columns you don't want and delete. What if the file is too large to open in M$ Excel? Well, Linux offers the awk command as the fastest solution.

For example, let's assume you have a comma delimited CSV file in your Home directory called myfile.csv and you want to display the first and third column

awk -F, '{OFS=",";print $1,$3}' < ~/myfile.csv

To actually strip out the first and third column from this file, to another file, you pipe the result.

awk -F, '{OFS=",";print $1,$3}' < ~/myfile.csv > ~/mynewfile.csv


You can select as many columns you would like to keep by, adding its column number, pre-pended with a dollar sign.

awk -F, '{OFS=",";print $1,$3,$4,$6}' < ~/myfile.csv > ~/mynewfile.csv


sfdisk: cannot open /dev/sdb read-write

I have Marius's excelent mdadm Cheat Sheet bookmarked (http://www.ducea.com/2009/03/08/mdadm-cheat-sheet/). Well, it is really a crib sheet. A great reference of mdadm, used to manage and monitor software RAID devices.

However, I had a problem with the following (on kubuntu) when trying to copy the partitions from a current drive (sda), to a new drive (sdb).

sfdisk -d /dev/sda | sfdisk /dev/sdb

/dev/sdb: Permission denied

sfdisk: cannot open /dev/sdb read-write


Simply add 'sudo' to both statements for this to work.

sudo sfdisk -d /dev/sda | sudo sfdisk /dev/sdb


Wednesday, 7 August 2013

The easiest way to split and merge pdf files in linux

I scanned some documents to .pdf format but, I wanted to email them all in one .pdf file.

The easiest way to split, merge or edit pdf files in linux is to use pdftk.

sudo apt-get install pdftk
or
sudo aptitude install pdftk
or
sudo yum install pdftk
depending on what flavour of linux you have.

pdftk is quite powerful but, here are a few examples.

Split a multi-page pdf into separate files:

pdftk largepdfile.pdf burst
results in a number files like 0001.pdf, 0002.pdf, etc.

Merge files into one PDF file:

pdftk *.pdf cat output largepdfile.pdf
or
pdftk file1.pdf file2.pdf file3.pdf cat output largepdfile.pdf

Saturday, 12 January 2013

Converting date formats in a flat-file using Regular expressions

I use two free text editors for preparing flat-files (.csv, etc.) prior to importing into MySQL.

I use Notepad++ in M$ Windows and Kate in Linux.  Both can do Regular expression Search & Replace upon text.

I find regular expressions very useful for preparing date fields prior to import into a database table.  So, converting the UK date format
dd/mm/yyyy (12/01/2013) into a MySQL DATE, DATETIME or, TIMESTAMP datatype (2013-01-12) is easy.

Search:
([0-9]+)/+([0-9]+)/+([0-9]+)


Replace (converts UK date format):
\3-\2-\1

Replace (converts US date format):
\3-\1-\2


So the above UK example searches for dates in the UK date format dd/mm/yyyy and converts them to yyyy-mm-dd.

Before:
Click image to enlarge
After:
Click image to enlarge
Datatypes:
Unlike M$ Excel, these text-editors can cope with large files and do this relatively quickly.

Nice tutorials on Regular expressions at http://www.regular-expressions.info/


Monday, 24 December 2012

Using the Draytek Vigor 2800V after Fibre Broadband (FTTC / VDSL)


The Draytek Vigor 2800V is a ADSL 2 / 2+ (Broadband) Router / Firewall with VPN / VoIP Server capabilities.  Currently you can get these second-hand for about £30-£40.  The Vigor 2800VG also has 802.11g wireless and are about £45-£55 second-hand.

So, you now have Fibre Broadband (FTTC/VDSL) and your old Draytek Vigor 2800V is just a Door stop. Well, at least it can be an expensive Printer Server right? You still want to use it for VoIP (Voice over IP)? Well, you cannot. Not as it stands anyway. Good old Draytek forced the default (World Wide) traffic to go out of the WAN (ADSL) port and no amount of messing about with routing in the Web Configuration Interface is going to solve that.

I found the solution!...

Here are the steps I took to get it working for VoIP. Offcourse, once you have forced a default route into the 2800V, it'll be useful for VPN, etc. again too. I am assuming that you were supplied with a new Router when you got Fibre Broadband.

  1. Make a note of your new Router's IP address. You need this to tell the Vigor 2800V where to route default (World Wide) traffic.

  2. If your old Vigor 2800V still has its old configuration, then you will need to reset it back to Factory Settings. Doing this will ensure that the following steps work and are not circumvented by some custom settings you may have. You can do this by inserting a Pencil into the small hole marked, 'Factory Reset', holding it for about 10 seconds, until, the ACT LED (Light) flashes erratically. Remove the Pencil and the Router will reboot, back to its original set up.

  3. Login into the Vigor 2800V Web Configuration Interface at 192.168.1.1 (Factory set IP address).

  4. Go into the Internet Access > PPPoE / PPPoA window. Disable the PPPoE / PPPoA Client. Click 'OK' and this will reboot your Vigor 2800V.

  5. Having logged back in, goto LAN > General Setup. Under For NAT Usage, set the 1st IP address. This will be the new IP address of the Vigor 2800V on your LAN. Remeber NOT to set it to the same IP address as any other device on your LAN, especially that used by your new Router.

  6. Disable IP Routing Usage. Disable DHCP Server. Assuming that you are using your new Router for DHCP and do NOT want a conflict.

  7. Now, add the IP address/es for the DNS Servers. Your ISP should have provide these. If not, do a Internet search for your ISP and DNS to find these. Otherwise, just enter the IP address of your new Router and hopefully it will resolve DNS fine for you.

  8. Click 'OK' and the Vigor 2800V will reboot itself.

  9. Log back in and at this point you could add your SIP account to VoIP > SIP Accounts but, it still will not work! One more step to fix this.

  10. You now need to Telnet into the Vigor 2800V CLI (Command Line Interface). You can do this in M$ Windows by bringing up a Cmd window or, in a Linux BASH or, my preference, using the PuTTY client application. Telnet your Vigor 2800V's IP address, port 23. If you have not yet set a password, just hit <ENTER>.

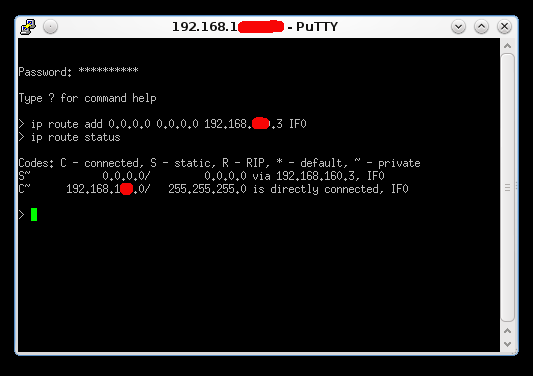
  11. Now type the following, ensuring that you put your new Router's IP address where indicated:-

    Code:
    ip route add 0.0.0.0 0.0.0.0 <New Router's IP address> IF0

    then press <ENTER>.

    Breaking this down, you are setting a default route of 0.0.0.0 with netmask of 0.0.0.0 via your new Router's IP address on the Vigor 2800V's LAN port (IF0).


    In my above example, .3 is my new Router that is connected to the BT FTTC VDSL NTE device.

  12. IF you have not done so in Step 9, set up your VoIP > SIP Accounts and you should now have VoIP again!

You can now also use the VPN Server too but, you will have to either open the required ports on your new Router or, set up as DMZ (demilitarized zone) Host on the new Router.

This solution works for my Vigor 2800V running 2.8.2 firmware.  My New Router is the Technicolor TG582n FTTC.