Showing posts with label Linux / Ubuntu. Show all posts

Monday, 11 November 2019

Monitor your mdadm RAID Arrays and get E-mail Alerts

You can be using a piece of software for some time and not know of one of it most useful functions. In my Desktop computer I use a software RAID1 to protect me against any data loss. RAID is where you join two or, more Hard Drives into a mirrored array. This basically means that if a drives fails, you don't lose all your data. If you also mirror the Operating system, it results in no or, little downtime.

I have two identically sized SSD (Solid State Drives) and two identically sized hard drives. The SSDs have two identically sized partitions for the Operating System and Boot. I‘d be gutted to be without my PC for too long following a failure.

This article is not about setting up or, configuring my chosen mdadm software raid but, how to get automated alerts if there is degradation. A warning before potential drive failure. I only have found out about getting email alerts recently and until now, manually ran cat /proc/mdstat from time to time.

md0 is my Boot and OS.
md1 is my /home.

media:~$ cat /proc/mdstat
Personalities : [raid1] [linear] [multipath] [raid0] [raid6] [raid5] [raid4] [raid10]
md1 : active raid1 sdb5[3] sdd5[2]
1952405312 blocks super 1.2 [2/2] [UU]

md0 : active raid1 sda1[0]
58091392 blocks super 1.2 [2/1] [UU]

unused devices:

Prerequisites

Before we get started:

  • You have to have an SMTP server that can send the emails from your workstation, to the recipient (i.e. your corporate exchange or Gmail).
  • You have the credentials for a user that is able to send Email on that server (i.e. a mailbox or a Gmail account).

There are a few simple SMTP servers out there. The ssmtp (Simple S.M.T.P) package works well. There are better setup articles but we can quickly set it up.

To install the ssmtp (Simple S.M.T.P) package, use the following command:

sudo apt-get install ssmtp

Using your favourite editor, edit the configuration file:

sudo nano /etc/ssmtp/ssmtp.conf

Edit the following lines. The number after the colon, is the port number used to connect to your email providers SMTP service.

root=username@gmail.com
mailhub=smtp.gmail.com:587
hostname=username@gmail.com
UseSTARTTLS=YES
AuthUser=username
AuthPass=password
FromLineOverride=yes

In order to make the default (root) “from” field be the server name, edit the /etc/ssmtp/revaliases file:

root:machine-name@some-domain.com:smtp.gmail.com

Test the ssmtp setup by sending an Email:

echo "Test message using ssmtp" | sudo ssmtp -vvv your-email@some-domain.com

Configure mdadm

sudo nano /etc/mdadm/mdadm.conf

Just find and edit the following line:

MAILADDR username@gmail.com

Rather than just restart the service, it is best to restart the PC.

You can do a quick test that it is now working

sudo mdadm --monitor --scan --test -1

Wednesday, 14 March 2018

Creating a 1 centimetre squared light grey grid on A4 paper using Inkscape

My wife wanted to draft out a crossword puzzle for her Rainbow Girl Guides unit. She needed a faint 1 centimetre squared grid to plan it out. She would use a pencil and plan the word positions. Finally, tracing over the words with a pen and drawing in required squares.

Inkscape is a free and open-source vector graphics editor, available for Linux, Windows and Mac OS X; it can be used to create or edit vector graphics such as illustrations, diagrams, line arts, charts, logos and complex paintings.

Inkscape has a Grid extension but, it requires that you enter some values in pixels.

So, in my case because I wanted 1 centimetre squares I

<SHIFT> + <CTRL> + <D>

which is the shortcuts keys for

File → Document Properties

I selected A4 and then selected in the 'Units' drop-down 'cm'. I noted down that, an A4 piece of paper was 21 cms width, by 29.7 cms height. I then changed the 'Units' drop-down to 'px' for pixels. This gave me 744.09 pixels width. I then divided 744.09 by 21. Rounding down...

35.43 pixels = 1 centimetres

Noting this down I then went and created the grid.

Extensions (Extras) → Render → Grid

I left the 'Line Width' at 1 pixel. I changed both the 'Horizontal' and 'Vertical' spacings to 35.4 pixels. Clicking on the 'Apply' button results in a visible and printable page with a 1 cms squared grid upon. However, this was in the default Stroke colour, black. I wanted to lighten this so that, it was just a faint background grid layout, for my wife to use. So, I wanted to change it to light grey colour lines.

Having highlighted the grid

<CTRL> + <A>

which is the shortcuts keys for

Edit → Select All

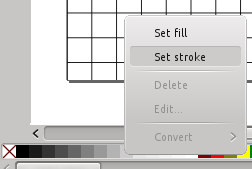
I then right mouse clicked on the '20% grey' colour from the colour pallete which was at the bottom of the editor pane. Offcourse, if I wanted this to be like a school math pages, I could have selected a light blue colour.

Done!

If you do not want to go through all of the above then, you can download my SVG file here,
A4_1cm_square_grid_paper.svg

Friday, 21 July 2017

AWS - How do I redirect HTTP traffic on my server to HTTPS on my Load Balancer?

This article is merely notes for myself just now. I may turn it into a full article if I get any feedback.

I have a AWS (Amazon Web Service) Free Tier trial account and currently experimenting and going through tutorials. I have set up an Elastic Load Balancer to two Apache2 PHP Webservers (HTTPS) with, a MySQL DB Server. I then put a copy of my bespoke PHP pages, searching my music collection database.

AWS - How do I set a Elastic (fixed) IP for the Load Balancer?

I wanted to set a DNS entry for aws.taurus2.co.uk
You cannot set an Elastic IP for the Load Balancer. Instead, set a CNAME in your DNS to the Load Balancers 'DNS Name'.

i.e.

aws CNAME myloadbalancer-1641756311.eu-west-2.elb.amazonaws.com

AWS - How do I redirect HTTP traffic on my webserver to HTTPS on my Load Balancer?

Next, I wanted to redirect HTTP traffic on my webservers to HTTPS on the Load Balancer.

sudo nano /etc/apache2/apache2.conf

Add or change in the <Directory /var/www/> section

AllowOverride All
sudo nano /var/www/html/.htaccess
RewriteEngine on RewriteCond %{HTTP:X-Forwarded-Proto} ^http$ RewriteRule .* https://%{HTTP_HOST}%{REQUEST_URI} [R=301,L]

The above tests the X-Forwarded-Proto header and redirects HTTP to HTTPS, without interfering with ELB health check.

sudo service apache2 reload

You can tail your apache access log with the below which, removes any "ELB-HealthChecker" entries which get in the way.

tail -F /var/log/apache2/access.log | grep -v "ELB-HealthChecker"

References:
https://forums.aws.amazon.com/thread.jspa?messageID=745509

Wednesday, 28 June 2017

How to see Debian/Ubuntu Security advisories and receive email alerts

Security advisories are published by leading Linux O.S. distributors, announcing important security patches that should be applied as a matter of urgency to safeguard a particular piece of software and ultimately, safeguard your Linux Operating System.

Different Linux flavours can be set up to automatically email a notification to you. You can also set up automated security patching. I will show you how below.

Below are several links to visit for Security advisory notices and details.

http://www.linuxsecurity.com/content/section/3/170/ - Shows Security advisories for several flavours of Linux O.S.

https://www.debian.org/security/ - Shows Security advisories for Debian

https://www.ubuntu.com/usn/ - Shows Security advisories for Ubuntu

Prerequisites

Before we get started:

  • You have to have an SMTP server that can send the emails from your workstation, to the recipient (i.e. your corporate exchange or Gmail).
  • You have the credentials for a user that is able to send Email on that server (i.e. a mailbox or a Gmail account).

There are a few simple SMTP servers out there. The ssmtp (Simple S.M.T.P) package works well. There are better setup articles but we can quickly set it up.

To install the ssmtp (Simple S.M.T.P) package, use the following command:

sudo apt-get install ssmtp

Using your favourite editor, edit the configuration file:

sudo nano /etc/ssmtp/ssmtp.conf

Edit the following lines. The number after the colon, is the port number used to connect to your email providers SMTP service.

root=username@gmail.com
mailhub=smtp.gmail.com:587
hostname=username@gmail.com
UseSTARTTLS=YES
AuthUser=username
AuthPass=password
FromLineOverride=yes

In order to make the default (root) “from” field be the server name, edit the /etc/ssmtp/revaliases file:

root:machine-name@some-domain.com:smtp.gmail.com

Test the ssmtp setup by sending an Email:

echo "Test message using ssmtp" | sudo ssmtp -vvv your-email@some-domain.com

Security Update email alerts for Debian/Ubuntu

Apticron is a simple script which sends daily emails about pending package updates such as security updates.

sudo apt-get install apticron

Configure Apticron

sudo nano /etc/apticron/apticron.conf

Edit the following line, ‘EMAIL=’ changing it to your email address

# apticron.conf
#
# set EMAIL to a space separated list of addresses which will be notified of
# impending updates
#
EMAIL="root"
[...]

You will now receive an email alert once a day if, there are any security advisories.

Automatic Security Updates

To check if your Debian / Ubuntu system has Automatic Security Updates installed, you can manually run it with verbose.

sudo apt-get update
sudo unattended-upgrades -v

If this gives an error then, it is not installed so execute
sudo dpkg-reconfigure --priority=low unattended-upgrades

Once installed, check
cat /etc/apt/apt.conf.d/20auto-upgrades

This should result in
APT::Periodic::Update-Package-Lists "1";
APT::Periodic::Unattended-Upgrade "1";

If not, edit the file and set APT::Periodic::Unattended-Upgrade to "1".

References:
https://help.ubuntu.com/community/AutomaticSecurityUpdates
https://www.quora.com/How-can-I-get-email-alerts-for-Linux-security-patches-mainly-Ubuntu-CentOS
http://www.linuxsecurity.com/content/section/3/170/
https://www.debian.org/security/
https://www.ubuntu.com/usn/

Monday, 29 May 2017

Trying to mount a Windows NTFS HDD on linux errors, "The disk contains an unclean file system"

I had a friend ask me to copy files from her old dying laptop of a spec that was only suitable for Windows XP. She had upgraded it to Windows 8.1 and it was struggling. She got hold of a newer laptop and wanted me to copy her files across.

Being the always cautious techie, I took the old HDD out and tried mounting it on my Ubuntu 14.04LTS, to virus and Rootkit scan it first, before backing up her files. The HDD would not mount and error with:

"The disk contains an unclean file system...."

A bit of research concluded that the Windows 8.1 system was probably set for Fast Startup.

How to disable or enable Fast Startup in Windows 8.1

I started the old laptop in Safe Mode and navigated to the Control Panel to 'Power Options' -> 'System Settings' -> 'Advanced'. I then unticked the box, 'Turn on fast startup (recommended)' thus disabling Fast Startup. Then, shutdown the laptop.

I was then able to mount the drive and access her files.

How to protect your Samba from the latest ransomware SambaCry Vulnerability (CVE-2017-7494)

In May 2017 systems worldwide were hit by the WannaCry ransomware. If you get infected then, then your personal files will be encrypted and a pop up message appears to say that you must pay a ransom (usually BitCoins) or, risk losing your precious files. If you have backed up your files recently then, congratulations. Wipe and reinstall your infected PC / system and recover your backups. If you didn't back up recently, too bad. You don't expect the criminals to really give you your files back after paying the (first) ransom do you!?

Stay ahead of the criminals and ensure your PC / systems are security patched automatically, before you get hit by the latest flavour of virus / ransomware.

Below are link and tips on how to protect yourself against WannaCry 2017.

Debian / Ubuntu

Well, if you have set up automatic security updates on your Debian or, Ubuntu as I mentioned in my Dirty COW exploit and Automatic Security Updates article then, you're already fixed for this exploit.

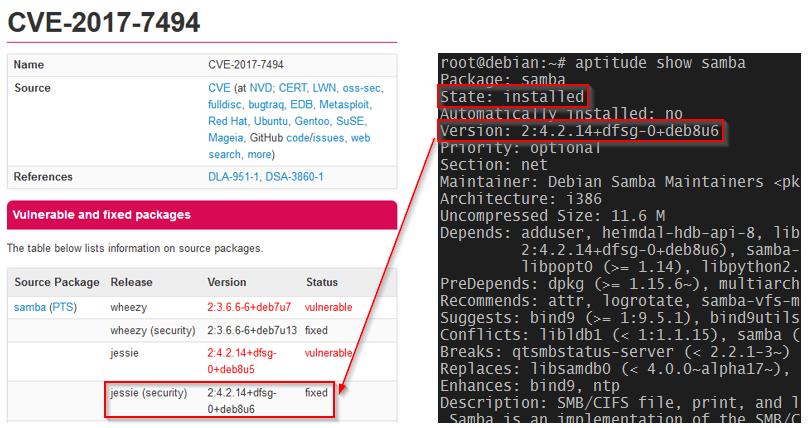
Whether you just want to check that you've patched or, want to patch your systems yourself, head over to the Tecmint article, How to Fix SambaCry Vulnerability (CVE-2017-7494) in Linux Systems.

In a nutshell

Check if you are already patched.

aptitude show samba


Image from tecmint.com

Visit my blog page above and configure your Debian / Ubuntu system to automatically install security updates.

Windows

Check out BitDefender's article, WannaCry wreaks havoc. How to keep your business safe.

In a nutshell

Visit, Microsoft Security Bulletin MS17-010 - Critical and ensure you download and patch your Window's version. Configure your Windows systems to automatically install Security Updates.

Saturday, 22 October 2016

Dirty COW exploit and Automatic Security Updates

The announcement this week of the Dirty COW (CVE-2016-5195), a privilege escalation vulnerability in the Linux Kernel reminded me to check my Ubuntu systems to ensure I had Automatic Security Updates activated.

This ancient bug has came to light now as, there is code in the wild using the vuneralbility that makes patching the Kernel a necessity. Systems that use the Linux OS need patching. This includes Android devices.

My home server and workstation already had Automatic Security Updates activated but, my Kodi Media Center did not.

I first wanted to check if I had been patched
zgrep -ie "\(CVE-2016-2108\|CVE-2016-2107\)" /usr/share/doc/libssl1.0.0/changelog.Debian.gz

Should respond
Debian
* Fix CVE-2016-2107
* Fix CVE-2016-2108

Ubuntu
- debian/patches/CVE-2016-2107.patch: check that there are enough
- CVE-2016-2107
- debian/patches/CVE-2016-2108-1.patch: don't mishandle zero if it is
- debian/patches/CVE-2016-2108-2.patch: fix ASN1_INTEGER handling in
- CVE-2016-2108

If your Android device prompts you for a System Update, don't ignore it, run it.

Automatic Security Updates
To check if your Debian / Ubuntu system has Automatic Security Updates is installed, you can manually run it with verbose.
sudo apt-get update
sudo unattended-upgrades -v

If this gives an error then, it is not installed so execute
sudo dpkg-reconfigure --priority=low unattended-upgrades

Once installed, check that
cat /etc/apt/apt.conf.d/20auto-upgrades

This should result in
APT::Periodic::Update-Package-Lists "1";
APT::Periodic::Unattended-Upgrade "1";

If not, edit the file and set APT::Periodic::Unattended-Upgrade to "1".

References:
https://dirtycow.ninja/
https://help.ubuntu.com/community/AutomaticSecurityUpdates

Saturday, 25 June 2016

Using sed to search and replace text in files within a directory

I needed to edit all files within a directory, replacing an ip address '10.0.7.52' with 'localhost'.

sed is a very powerful command line tool. All the help web pages look intimidating so, it took me a long time to appreciate and understand the basics of it.

The basic usage is:
sed [options] commands [file-to-edit]


I used:
sed -i -e 's/10\.0\.7\.52/localhost/g' *


-i option is used to edit in place on filename.

-e option indicates a command to run.

s is the command used to replace the found expression "10.0.7.52" with "localhost". The command and the two 'words' are separated by forward slashes.

g stands for "global", meaning to do this for the whole line. If you leave off the g and "10.0.7.52" appears twice on the same line, only the first "10.0.7.52" is changed to "localhost".

The backslashes are to escape the following character (the dot) otherwise, it would be interpreted as wildcard for a single character and not, as a dot in the ip address.

Finally, the asterisk states to run this on all files in the current directory.

Removing columns in a csv file

Sometimes I get supplied a large comma separated (.CSV) file from a client with erroneous data columns (fields) in it. Most people would say, open it in M$ Excel, highlight the columns you don't want and delete. What if the file is too large to open in M$ Excel? Well, Linux offers the awk command as the fastest solution.

For example, let's assume you have a comma delimited CSV file in your Home directory called myfile.csv and you want to display the first and third column

awk -F, '{OFS=",";print $1,$3}' < ~/myfile.csv

To actually strip out the first and third column from this file, to another file, you pipe the result.

awk -F, '{OFS=",";print $1,$3}' < ~/myfile.csv > ~/mynewfile.csv


You can select as many columns you would like to keep by, adding its column number, pre-pended with a dollar sign.

awk -F, '{OFS=",";print $1,$3,$4,$6}' < ~/myfile.csv > ~/mynewfile.csv


sfdisk: cannot open /dev/sdb read-write

I have Marius's excelent mdadm Cheat Sheet bookmarked (http://www.ducea.com/2009/03/08/mdadm-cheat-sheet/). Well, it is really a crib sheet. A great reference of mdadm, used to manage and monitor software RAID devices.

However, I had a problem with the following (on kubuntu) when trying to copy the partitions from a current drive (sda), to a new drive (sdb).

sfdisk -d /dev/sda | sfdisk /dev/sdb

/dev/sdb: Permission denied

sfdisk: cannot open /dev/sdb read-write


Simply add 'sudo' to both statements for this to work.

sudo sfdisk -d /dev/sda | sudo sfdisk /dev/sdb


Wednesday, 7 August 2013

The easiest way to split and merge pdf files in linux

I scanned some documents to .pdf format but, I wanted to email them all in one .pdf file.

The easiest way to split, merge or edit pdf files in linux is to use pdftk.

sudo apt-get install pdftk
or
sudo aptitude install pdftk
or
sudo yum install pdftk
depending on what flavour of linux you have.

pdftk is quite powerful but, here are a few examples.

Split a multi-page pdf into separate files:

pdftk largepdfile.pdf burst
results in a number files like 0001.pdf, 0002.pdf, etc.

Merge files into one PDF file:

pdftk *.pdf cat output largepdfile.pdf
or
pdftk file1.pdf file2.pdf file3.pdf cat output largepdfile.pdf

Thursday, 29 November 2012

TIP: How do I type the copyright symbol ©?

Mac

Simply enter Option + G.


M$ Windows

Whilst Num Lock is on, hold down the ALT key, keep depressed and type on the Numeric keypad '0169'.

Linux

This works on (k)ubuntu at least, using a UK keyboard.

AltGr + Shift + C keys.


Addendum

The above Linux solution did not work in GIMP for me when I was trying to create a Watermark for my photos.  The solution was to do the above in something like Kate (text editor), highlight and copy it to the Clip board and then paste it into GIMP's text editor window.


Wednesday, 28 November 2012

MySQL Correct character case of names

Sometimes a client will pass you some data with forenames, surnames or, both with people's names all in upper-case, lower-case or, a jumbled mess.  This looks a bit unprofessional when you are doing mail shots or e-mail mailings.

The below code shows how you can select the forename field, correcting the data's case.  It sets the first character to upper-case and the rest, lower-case.

Code:
SELECT CONCAT(UPPER(LEFT(forename, 1)), (SUBSTRING(LOWER(forename), 2))) As fname
FROM table1;


Alternatively, if you want to correct the data in the database table, you would...

Code:
UPDATE table1 SET forename =  CONCAT(UPPER(LEFT(forename, 1)), (SUBSTRING(LOWER(forename), 2)));


If the table contains a lot of data then, you may wish to run the UPDATE code over night, out of hours!


Saturday, 15 September 2012

linux BASH - replacing text in a file

If you want to replace some text within a file, that is too large to open in a GUI application then, this is when you fall back on the command line tools like sed.

But to make the change permanent, you have to add -i to the command:

Code:   
Syntax:
sed -i 's/<old_word>/<new_word>/g' <file>
sed 's/<old_word>/<new_word>/g' input.txt > output.txt

sed -i 's/Hello/hello/g' input.txt
   

Sed can also use regular expressions, so it's a very powerful tool.

The above searches for 'Hello' and replaces it with 'hello'.

Thanks to Eric_T for this which, I put here as a reminder to myself.

Code:   
#!/bin/bash
OLD="xyz"
NEW="abc"
DPATH="/home/you/foo/*.txt"
BPATH="/home/you/bakup/foo"
TFILE="/tmp/out.tmp.$$"
[ ! -d $BPATH ] && mkdir -p $BPATH || :
for f in $DPATH
do
  if [ -f $f -a -r $f ]; then
    /bin/cp -f $f $BPATH
   sed "s/$OLD/$NEW/g" "$f" > $TFILE && mv $TFILE "$f"
  else
   echo "Error: Cannot read $f"
  fi
done
/bin/rm $TFILE


A Note About Bash Escape Character
A non-quoted backslash \ is the Bash escape character. It preserves the literal value of the next character that follows, with the exception of newline. If a \newline pair appears, and the backslash itself is not quoted, the \newline is treated as a line continuation (that is, it is removed from the input stream and effectively ignored). This is useful when you would like to deal with UNIX paths. In this example, the sed command is used to replace UNIX path "/nfs/apache/logs/rawlogs/access.log" with "__DOMAIN_LOG_FILE__":

Code:   
#!/bin/bash
## Our path
_r1="/nfs/apache/logs/rawlogs/access.log"

## Escape path for sed using bash find and replace
_r1="${_r1//\//\\/}"

# replace __DOMAIN_LOG_FILE__ in our sample.awstats.conf
sed -e "s/__DOMAIN_LOG_FILE__/${_r1}/" /nfs/conf/awstats/sample.awstats.conf  > /nfs/apache/logs/awstats/awstats.conf

# call awstats
/usr/bin/awstats -c /nfs/apache/logs/awstats/awstats.conf


The $_r1 is escaped using bash find and replace parameter substitution syntax to replace each occurrence of / with \/.

Thanks to Vivek Gite
http://www.cyberciti.biz/faq/unix-linux-replace-string-words-in-many-files/

Very useful for replacing repetitive text string within a .csv file!

Wednesday, 22 August 2012

Convert a Tab separated to Comma separated file

If you want to replace some text within a file, that is too large to open in a GUI application then, this is when you fall back on the command line tools.

Sometimes I get a Tab separated (.tsv/.txt) file and I need to convert it to a Comma separated (.csv) file before I can import it into a database table.

On a Linux server:
Code:   
tr -s '\t' <input | tr '\t' ',' >output
   
Substitute 'input' for the original filename and 'output' for the desired output filename.


Tuesday, 14 August 2012

MySQL distinct count of data across multiple tables

You want to do a unique count of data across multiple tables.

Below is an example of getting a count of unique email addresses across two tables. Actually, I am looking for Females, aged 25 to 45 in the East Midlands, UK. I don't want duplicates because, I would not want to email the same person twice!

Code:   
SELECT COUNT(DISTINCT email) As East_Midlands
FROM (
SELECT email
FROM table_a
WHERE (gender = 'F' OR LOWER(title IN ('ms', 'miss', 'mrs')))
AND str_to_date(date, '%d/%m/%Y') BETWEEN '1967-01-01' AND '1987-08-13'
AND (SUBSTRING(postcode,1,2) IN ('CB','CO','DE','DN','IP','LE','LN','NG','NR','PE') OR postcode LIKE 'S[1-9]%')
UNION
SELECT email
FROM table_b
WHERE (gender = 'F' OR LOWER(title IN ('ms', 'miss', 'mrs')))
AND str_to_date(DOB, '%Y%m%d') BETWEEN '1967-01-01' AND '1987-08-13'
AND (SUBSTRING(postcode,1,2) IN ('CB','CO','DE','DN','IP','LE','LN','NG','NR','PE') OR postcode LIKE 'S[1-9]%')
) As SubQueryAlias;
   
I hope that makes sense. So, you have multiple selects, joined by the 'UNION', wrapped by the outer query which counts the distinct email addresses of the tables it embodies (as many as you want).

The 'As SubQueryAlias' at the end is needed to pull it together or, SQL will throw an error.


Monday, 4 June 2012

Thwart attacks to your SFTP server with DenyHosts

For automated blocking of attackers try denyhosts. DenyHosts is a script intended to be run by Linux system administrators to help thwart SSH server attacks (also known as dictionary based attacks and brute force attacks).

http://www.cyberciti.biz/faq/block-ssh-attacks-with-denyhosts/


Saturday, 24 March 2012

ClamAV 97.4 error while loading shared libraries

I installed ClamAV 0.97.4 on my Kubuntu system today, the installation went OK and no error were shown but when I tried to run virus scanning I got this error message:

Quote:   
clamscan: error while loading shared libraries: libclamav.so.6: cannot open shared object file: No such file or directory


A quick browse and found that the following fixed this:
Code:   
sudo ldconfig
   

Tuesday, 6 March 2012

20 Linux System Monitoring Tools Every SysAdmin Should Know

Very good article on some essential monitoring tools.

http://www.cyberciti.biz/tips/top-linux-monitoring-tools.html

iptables: Blocking attacking IP addresses

Excellent article on using iptables to block an attacking IP address.

http://www.cyberciti.biz/faq/linux-iptables-drop/

I needed to block a known russian SSH/SFTP hacker.

Code:   
iptables -A INPUT -s 91.205.189.27/255.255.255.255 -j DROP


Even better for automated blocking of attackers is denyhosts. DenyHosts is a script intended to be run by Linux system administrators to help thwart SSH server attacks (also known as dictionary based attacks and brute force attacks).

http://www.cyberciti.biz/faq/block-ssh-attacks-with-denyhosts/