Monday, 4 February 2019
Buying goods via the internet for a offspring who are in a foreign land
Buying gifts in your country and then sending by international courier is not cheap. For Christmas we boxed up gifts. It weighed under 6 kgs but, was so expensive.
There are a lot of ex-pats through out the world so, we expected there to be online site within a country where, you could have UK food and drink delivered. What we found in fact was that there are UK based online sites but, they were sending from the UK. So again, expensive P&P!
Easter was coming up so, we wanted to send a few of his favourite foods. We did do a search of Tokyo based online stores and indeed found some selling UK/western product. However, when it came to purchasing from the Shopping Cart, we could couldn't set a Tokyo delivery address with a different invoice address. The invoice address is important as it is used for your card purchase. We just couldn't set a UK invoice (payment) address.
Finely, I tried www.amazon.jp for Amazon Japan. You could search for desired destination country in this way. I did find that I had to create a new Amazon account because, I couldn't log in with my UK account credentials. I cannot read Japanese so then, before I continued, I set the language to English.
I then set up the security so that the account could only be logged in to with two-factor authentication. What this means is that, you have your normal username and password but, a text or voice message is sent to your desired mobile / landline telephone number. The system sends (at no cost) a six-digit code for you to type in.
You then are able to browse the website with item descriptions, Shopping Cart and Payment steps in English. One more thing which, was very important for Japan is, to get the FULL address from the recipient. It was over wise difficult to complete the delivery part of the purchase without the district and postcode entered in the correct order.
I hope this brief article will be of use to someone.
Sunday, 3 February 2019
My TV's HDMI port/s no longer work! Do I throw the TV away?
I am aiming this article to the everyday TV user not, the electronic geek. A 'plug n play' solution. However, some of you might have researched and seen that you can fix electronic devices by, ' using a Hairdryer / Heat Gun on the xxxx chip' or, ' baking the xxxx circuit board in an Oven'. Let me dissuade you from this please. The resulted 'fix' seldom lasts long and could even fail and you end up with a useless (dead) TV.
The technically savvy would know that you can buy replacement (fully working) circuit boards for around £30 but, I am not aiming this article at those people. They don't need my help. Also, in this disposable World, it can be hard to find such replacements for an old TV. For instance, I could not get a replacement board for the LG LCD TV I have that, was manufactured six years ago. A major grumble of mine and at the time of writing, the EU are proposing law that forces manufacturers to make electronic devices last longer and be more repairable.
Jumping straight to the answer...
Look at the back of your TV and if you see three sockets that say, 'Component Video In' then, buying the following will get you back up and going:-
1 x HDMI to YPbPr RGB Component Converter
1 x Component Video cable
1 x RCA Stereo audio cable
If you think that this is just too many unsightly cables, the converter device is small enough to be hidden from view. Even use Velcro to stick it behind the back of your TV and use short cables. No one will notice.
If you don't have an AV Receiver / Amplifier and want to connect multiple HDMI devices to my above solution then you will need to also look at getting a HDMI Switch device. There are many available and can allow anywhere between three and five devices to be connect to a single HDMI output that, would then be connected to the converter mentioned above.
My story in depth
A work colleague gave me an LG 47 inch LED TV featuring 100Hz, 1080p HD and Freeview HD. He was throwing it away as, the HDMI ports had stopped working. He just went out and bought a new TV. Yes, he was probably better paid than me! Thanks Scott!
All my AV devices connected to my Onkyo AV Receiver which has six HDMI inputs and one HDMI output which, I would normally have connected to my TV. So, I would normally have only one HDMI lead connected to the TV.
For completeness, connected to my AV receiver are:-
Blu-ray player, FreeSat PVR and a DIY Kodi Media Center that I built from an old PC.
Sadly, I could not get a replacement circuit board for the TV so, I looked at other options. It just bugs me when, an otherwise good device is crippled by the poor manufacture of a single semiconductor chip.
Most modern TVs come with a plethora of connections. If you look at the back of modern TVs it can be quite daunting. HDMI is the latest connection that gives you a single socket to connect your full HD (1080p) devices to your TV. It is by far the most convenient way to plug an AV (Audio – Video) device in to a TV. Thus, most device manuals don't go in to detail about the 'other' connections (sockets) on your TV.
Before HDMI, Component video (YPBPR) was an alternative and can be found on most A/V Receiver, Blu-ray players, DVD players and LCD video projectors.
Update
After five months use, my Porta died. I contacted the supplier who, were the manufacturer and they sent a replacement. However, it was only the mains adapter that failed. So, I ordered a 5Vdc 3Amp mains adaptor and got the original going again.
Appendix
Below is what I bought and is an example only. There are other brands out there.
HDMI to YPbPr RGB Component Converter
Component Video RGB YUV 3 Phonos To 3 Phono Cable Lead 50cm 0.5m
Twin RCA Phono to RCA Phono male audio lead 1.5mtr
Wednesday, 14 March 2018
Creating a 1 centimetre squared light grey grid on A4 paper using Inkscape
My wife wanted to draft out a crossword puzzle for her Rainbow Girl Guides unit. She needed a faint 1 centimetre squared grid to plan it out. She would use a pencil and plan the word positions. Finally, tracing over the words with a pen and drawing in required squares.
Inkscape is a free and open-source vector graphics editor, available for Linux, Windows and Mac OS X; it can be used to create or edit vector graphics such as illustrations, diagrams, line arts, charts, logos and complex paintings.
Inkscape has a Grid extension but, it requires that you enter some values in pixels.
So, in my case because I wanted 1 centimetre squares I
which is the shortcuts keys for
I selected A4 and then selected in the 'Units' drop-down 'cm'. I noted down that, an A4 piece of paper was 21 cms width, by 29.7 cms height. I then changed the 'Units' drop-down to 'px' for pixels. This gave me 744.09 pixels width. I then divided 744.09 by 21. Rounding down...
35.43 pixels = 1 centimetres
Noting this down I then went and created the grid.
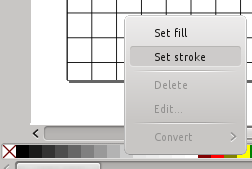
I left the 'Line Width' at 1 pixel. I changed both the 'Horizontal' and 'Vertical' spacings to 35.4 pixels. Clicking on the 'Apply' button results in a visible and printable page with a 1 cms squared grid upon. However, this was in the default Stroke colour, black. I wanted to lighten this so that, it was just a faint background grid layout, for my wife to use. So, I wanted to change it to light grey colour lines.
Having highlighted the grid
which is the shortcuts keys for
I then right mouse clicked on the '20% grey' colour from the colour pallete which was at the bottom of the editor pane. Offcourse, if I wanted this to be like a school math pages, I could have selected a light blue colour.
Done!
If you do not want to go through all of the above then, you can download my SVG file here,
A4_1cm_square_grid_paper.svg
Friday, 21 July 2017
AWS - How do I redirect HTTP traffic on my server to HTTPS on my Load Balancer?
This article is merely notes for myself just now. I may turn it into a full article if I get any feedback.
I have a AWS (Amazon Web Service) Free Tier trial account and currently experimenting and going through tutorials. I have set up an Elastic Load Balancer to two Apache2 PHP Webservers (HTTPS) with, a MySQL DB Server. I then put a copy of my bespoke PHP pages, searching my music collection database.
AWS - How do I set a Elastic (fixed) IP for the Load Balancer?
I wanted to set a DNS entry for aws.taurus2.co.uk
You cannot set an Elastic IP for the Load Balancer. Instead, set a CNAME in your DNS to the Load Balancers 'DNS Name'.
i.e.
AWS - How do I redirect HTTP traffic on my webserver to HTTPS on my Load Balancer?
Next, I wanted to redirect HTTP traffic on my webservers to HTTPS on the Load Balancer.
Add or change in the <Directory /var/www/> section
The above tests the X-Forwarded-Proto header and redirects HTTP to HTTPS, without interfering with ELB health check.
You can tail your apache access log with the below which, removes any "ELB-HealthChecker" entries which get in the way.
References:
https://forums.aws.amazon.com/thread.jspa?messageID=745509
Wednesday, 28 June 2017
Arrests in UK over Microsoft scam calls
At least one person I know will be happy to read about this. I had to wipe their PCs drive due to infection which resulted in this attempted scam. I then reinstalled M$ Windows with all the latest security patches. Thankfully, I was able to recover all their person files first.
Their PC got infected and a pop-up screen of some sort indicated a problem and to call the given 'Microsoft Support' telephone number. Although realising it was a scam, they then received numerous telephone calls, trying to get them to part with money to fix the PC remotely.
How to see Debian/Ubuntu Security advisories and receive email alerts
Security advisories are published by leading Linux O.S. distributors, announcing important security patches that should be applied as a matter of urgency to safeguard a particular piece of software and ultimately, safeguard your Linux Operating System.
Different Linux flavours can be set up to automatically email a notification to you. You can also set up automated security patching. I will show you how below.
Below are several links to visit for Security advisory notices and details.
http://www.linuxsecurity.com/content/section/3/170/ - Shows Security advisories for several flavours of Linux O.S.
https://www.debian.org/security/ - Shows Security advisories for Debian
https://www.ubuntu.com/usn/ - Shows Security advisories for Ubuntu
Prerequisites
Before we get started:
- You have to have an SMTP server that can send the emails from your workstation, to the recipient (i.e. your corporate exchange or Gmail).
- You have the credentials for a user that is able to send Email on that server (i.e. a mailbox or a Gmail account).
There are a few simple SMTP servers out there. The ssmtp (Simple S.M.T.P) package works well. There are better setup articles but we can quickly set it up.
To install the ssmtp (Simple S.M.T.P) package, use the following command:
Using your favourite editor, edit the configuration file:
Edit the following lines. The number after the colon, is the port number used to connect to your email providers SMTP service.
mailhub=smtp.gmail.com:587
hostname=username@gmail.com
UseSTARTTLS=YES
AuthUser=username
AuthPass=password
FromLineOverride=yes
In order to make the default (root) “from” field be the server name, edit the /etc/ssmtp/revaliases file:
Test the ssmtp setup by sending an Email:
Security Update email alerts for Debian/Ubuntu
Apticron is a simple script which sends daily emails about pending package updates such as security updates.
Configure Apticron
Edit the following line, ‘EMAIL=’ changing it to your email address
#
# set EMAIL to a space separated list of addresses which will be notified of
# impending updates
#
EMAIL="root"
[...]
You will now receive an email alert once a day if, there are any security advisories.
Automatic Security Updates
To check if your Debian / Ubuntu system has Automatic Security Updates installed, you can manually run it with verbose.
sudo unattended-upgrades -v
If this gives an error then, it is not installed so execute
Once installed, check
This should result in
APT::Periodic::Unattended-Upgrade "1";
If not, edit the file and set APT::Periodic::Unattended-Upgrade to "1".
References:
https://help.ubuntu.com/community/AutomaticSecurityUpdates
https://www.quora.com/How-can-I-get-email-alerts-for-Linux-security-patches-mainly-Ubuntu-CentOS
http://www.linuxsecurity.com/content/section/3/170/
https://www.debian.org/security/
https://www.ubuntu.com/usn/
'Vaccine' created for yesterdays Petya (NotPetya) Ransomware attack
This latest ransomware attack will encrypt your Windows files and demand a ransom to have your files restored. Researchers have found a way to vaccinate against this virus if, you have not already been infected.
How to Enable the NotPetya/Petna/Petya Vaccine
For my friends and family, your best bet is to download the following file from the link below. Then go to your 'Downloads' folder. Run the nopetyavac’ or, ‘nopetyavac.bat’ file by clicking your right mouse button on the file and selecting, ‘Run as Administrator’. It will create the necessary vaccine file.
Any problems, drop me a message. This needs to be done on all M$ Windows PCs/Laptops that you own.
Click here to download https://download.bleepingcomputer.com/bats/nopetyavac.bat
Anyone wishing to not use the above file and also wish to learn a bit more about this virus visit,