Monday, 29 May 2017

Trying to mount a Windows NTFS HDD on linux errors, "The disk contains an unclean file system"

I had a friend ask me to copy files from her old dying laptop of a spec that was only suitable for Windows XP. She had upgraded it to Windows 8.1 and it was struggling. She got hold of a newer laptop and wanted me to copy her files across.

Being the always cautious techie, I took the old HDD out and tried mounting it on my Ubuntu 14.04LTS, to virus and Rootkit scan it first, before backing up her files. The HDD would not mount and error with:

"The disk contains an unclean file system...."

A bit of research concluded that the Windows 8.1 system was probably set for Fast Startup.

How to disable or enable Fast Startup in Windows 8.1

I started the old laptop in Safe Mode and navigated to the Control Panel to 'Power Options' -> 'System Settings' -> 'Advanced'. I then unticked the box, 'Turn on fast startup (recommended)' thus disabling Fast Startup. Then, shutdown the laptop.

I was then able to mount the drive and access her files.

How to protect your Samba from the latest ransomware SambaCry Vulnerability (CVE-2017-7494)

In May 2017 systems worldwide were hit by the WannaCry ransomware. If you get infected then, then your personal files will be encrypted and a pop up message appears to say that you must pay a ransom (usually BitCoins) or, risk losing your precious files. If you have backed up your files recently then, congratulations. Wipe and reinstall your infected PC / system and recover your backups. If you didn't back up recently, too bad. You don't expect the criminals to really give you your files back after paying the (first) ransom do you!?

Stay ahead of the criminals and ensure your PC / systems are security patched automatically, before you get hit by the latest flavour of virus / ransomware.

Below are link and tips on how to protect yourself against WannaCry 2017.

Debian / Ubuntu

Well, if you have set up automatic security updates on your Debian or, Ubuntu as I mentioned in my Dirty COW exploit and Automatic Security Updates article then, you're already fixed for this exploit.

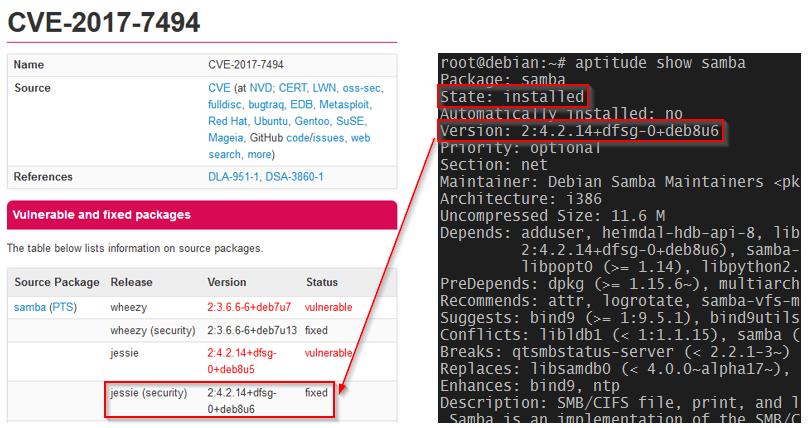
Whether you just want to check that you've patched or, want to patch your systems yourself, head over to the Tecmint article, How to Fix SambaCry Vulnerability (CVE-2017-7494) in Linux Systems.

In a nutshell

Check if you are already patched.

aptitude show samba


Image from tecmint.com

Visit my blog page above and configure your Debian / Ubuntu system to automatically install security updates.

Windows

Check out BitDefender's article, WannaCry wreaks havoc. How to keep your business safe.

In a nutshell

Visit, Microsoft Security Bulletin MS17-010 - Critical and ensure you download and patch your Window's version. Configure your Windows systems to automatically install Security Updates.

Saturday, 22 October 2016

Dirty COW exploit and Automatic Security Updates

The announcement this week of the Dirty COW (CVE-2016-5195), a privilege escalation vulnerability in the Linux Kernel reminded me to check my Ubuntu systems to ensure I had Automatic Security Updates activated.

This ancient bug has came to light now as, there is code in the wild using the vuneralbility that makes patching the Kernel a necessity. Systems that use the Linux OS need patching. This includes Android devices.

My home server and workstation already had Automatic Security Updates activated but, my Kodi Media Center did not.

I first wanted to check if I had been patched
zgrep -ie "\(CVE-2016-2108\|CVE-2016-2107\)" /usr/share/doc/libssl1.0.0/changelog.Debian.gz

Should respond
Debian
* Fix CVE-2016-2107
* Fix CVE-2016-2108

Ubuntu
- debian/patches/CVE-2016-2107.patch: check that there are enough
- CVE-2016-2107
- debian/patches/CVE-2016-2108-1.patch: don't mishandle zero if it is
- debian/patches/CVE-2016-2108-2.patch: fix ASN1_INTEGER handling in
- CVE-2016-2108

If your Android device prompts you for a System Update, don't ignore it, run it.

Automatic Security Updates
To check if your Debian / Ubuntu system has Automatic Security Updates is installed, you can manually run it with verbose.
sudo apt-get update
sudo unattended-upgrades -v

If this gives an error then, it is not installed so execute
sudo dpkg-reconfigure --priority=low unattended-upgrades

Once installed, check that
cat /etc/apt/apt.conf.d/20auto-upgrades

This should result in
APT::Periodic::Update-Package-Lists "1";
APT::Periodic::Unattended-Upgrade "1";

If not, edit the file and set APT::Periodic::Unattended-Upgrade to "1".

References:
https://dirtycow.ninja/
https://help.ubuntu.com/community/AutomaticSecurityUpdates

Saturday, 25 June 2016

Using sed to search and replace text in files within a directory

I needed to edit all files within a directory, replacing an ip address '10.0.7.52' with 'localhost'.

sed is a very powerful command line tool. All the help web pages look intimidating so, it took me a long time to appreciate and understand the basics of it.

The basic usage is:
sed [options] commands [file-to-edit]


I used:
sed -i -e 's/10\.0\.7\.52/localhost/g' *


-i option is used to edit in place on filename.

-e option indicates a command to run.

s is the command used to replace the found expression "10.0.7.52" with "localhost". The command and the two 'words' are separated by forward slashes.

g stands for "global", meaning to do this for the whole line. If you leave off the g and "10.0.7.52" appears twice on the same line, only the first "10.0.7.52" is changed to "localhost".

The backslashes are to escape the following character (the dot) otherwise, it would be interpreted as wildcard for a single character and not, as a dot in the ip address.

Finally, the asterisk states to run this on all files in the current directory.

Removing columns in a csv file

Sometimes I get supplied a large comma separated (.CSV) file from a client with erroneous data columns (fields) in it. Most people would say, open it in M$ Excel, highlight the columns you don't want and delete. What if the file is too large to open in M$ Excel? Well, Linux offers the awk command as the fastest solution.

For example, let's assume you have a comma delimited CSV file in your Home directory called myfile.csv and you want to display the first and third column

awk -F, '{OFS=",";print $1,$3}' < ~/myfile.csv

To actually strip out the first and third column from this file, to another file, you pipe the result.

awk -F, '{OFS=",";print $1,$3}' < ~/myfile.csv > ~/mynewfile.csv


You can select as many columns you would like to keep by, adding its column number, pre-pended with a dollar sign.

awk -F, '{OFS=",";print $1,$3,$4,$6}' < ~/myfile.csv > ~/mynewfile.csv


sfdisk: cannot open /dev/sdb read-write

I have Marius's excelent mdadm Cheat Sheet bookmarked (http://www.ducea.com/2009/03/08/mdadm-cheat-sheet/). Well, it is really a crib sheet. A great reference of mdadm, used to manage and monitor software RAID devices.

However, I had a problem with the following (on kubuntu) when trying to copy the partitions from a current drive (sda), to a new drive (sdb).

sfdisk -d /dev/sda | sfdisk /dev/sdb

/dev/sdb: Permission denied

sfdisk: cannot open /dev/sdb read-write


Simply add 'sudo' to both statements for this to work.

sudo sfdisk -d /dev/sda | sudo sfdisk /dev/sdb


Wednesday, 7 August 2013

The easiest way to split and merge pdf files in linux

I scanned some documents to .pdf format but, I wanted to email them all in one .pdf file.

The easiest way to split, merge or edit pdf files in linux is to use pdftk.

sudo apt-get install pdftk
or
sudo aptitude install pdftk
or
sudo yum install pdftk
depending on what flavour of linux you have.

pdftk is quite powerful but, here are a few examples.

Split a multi-page pdf into separate files:

pdftk largepdfile.pdf burst
results in a number files like 0001.pdf, 0002.pdf, etc.

Merge files into one PDF file:

pdftk *.pdf cat output largepdfile.pdf
or
pdftk file1.pdf file2.pdf file3.pdf cat output largepdfile.pdf