Wednesday, 22 February 2023

Diagnosing Broadband or, Wifi issues

I often either get asked about internet issues. I also see on social media, “Has anybody else experienced an on-going issue with Broadband product x? Our WiFi provision is way below the level which x claims”.

So, I’m going to try and help you diagnose the issue and maybe provide you with some quick fix suggestions. At least help you provide your ISP (Internet Service Provider) evidence of your issue. Also, what to do if your ISP is unhelpful in resolving your issue.

  • Internet faults
  • Broadband equipment
  • ISP equipment
  • Periodic Speed tests
  • Problems, faults and diagnosis
  • Visual inspection
  • “Turn it on and off again!”
  • Wifi signal degredation
  • Still slow speed or, no Internet
  • No resolution?

Hopefully save you on the cost, from you ensisting on an engineer visit. They (ISP or, OpenReach) may charge you if, no fault with their supply of the service is found.

Your ISP has an obligation to provide at least the Broadband speed which the purchase package states it gives. Note, this is not a Wifi speed. The speed of your devices to the Internet can be much less. This article will explain why and I give illustrations to all my speed tests, to show this.

Internet faults

Beyond your connection to your ISP is, the Internet. The is a global connection of third-party Servers (Large Computer), Computer, cables and associated connecting devices. Any which of these devices and cables can fail. For you, this could mean a temporary lose of reaching Servers or, Website in certain parts of the UK and/or, the World. However, you will still see some Websites (including your ISPs) and still (probably) be able to access your e-mails. E-mails depends upon whether you use your ISP supplied email account or, say Gmail (Google), Outlook (Microsoft), etc. These Internet outages / faults are beyond your ISPs control.

Broadband equipment

Wires or, Fibre cable are supplied by BT Openreach, CityFibre or, by another and these go to your property.

These companies would install a Modem. This converts the RF or, Optical signal to, a digital signal. These are beyond your ISPs control. They can do diagnoses though, using the carrier’s diagnostic tools and they can book an engineer to visit you. An engineer may repair or, replace any cable going to your premises. They may replace the Modem.

ISP equipment

Your ISP supplies you a Broadband package to, access the Internet. They have to guarantee a Broadband speed. They post to you a Broadband Router device. If your property is being connected to BT Telephone cable (inc. FTTC) or, Fibre cable for the first time then, your ISP would have booked an engineer to come. They will ensure a suitable connection to the outside of your property and the installation of a connection inside your property and any Modem.

The engineer will also connect your ISP supplied Router and conduct testing before they leave.

If your property already has a suitable connection for the type of Broadband package that you have subscribed to then, no engineer will be booked for the installation. Here, you will have to read the instructions of your supplied ISP Router and connect it to the already existing Modem.

The supplied Broadband Router will have been configured by your ISP with the necessary Account details, for it to connect to the Internet, via them, when switched on. This Router has built-in facilities for your digital devices to connect to the Internet via either wires, known as LAN cables or, Wifi. Wifi is a means for your devices to connect to the Router, via a Radio signal. I have to at this point say, “2.4GHz (Gigahertz)” and “5GHz (Gigahertz)” Bands. A lot of older devices use the 2.4Ghz but, modern devices that have a lot of demand for High Definition Videos, do have 5GHz, to meet the needs of a better Wifi speed.

There is another device, known as a LAN Switch or, Network Hub but, I won’t discuss it in this article. You would have purchased it yourself. These and their cables can become faulty.

Periodic Speed tests

I always suggest to friends and family to do periodic speed test. A piece of mind to check, that you are getting the speed of Broadband connection, that you are paying for.

However, to get an accurate reading, you need to use a device that is connected to the back of your ISP’s supplied Router, via a LAN Cable. They do usually supply one LAN cable with the Router. Hopefully, you kept it in a Drawer somewhere?

A Speedtest via a 2.4 GHz connected device will always show a much slower speed and I show why later.

A Speed test website that BT suggests that you use is,
https://www.speedtest.net/

You do not need to register an acount with the website but, doing so allows for all the periodic tests that you do, to be recorded. It allows you to look back and even show the speed that you were getting normally, before a fault occurred.

Here are examples of my current speed.

My ISP Fibre Broadband package guarantees 100 Mbps (Mega-bit per second) and the first image shows that I am above this. But, what about the image that says, “33.71 Mbps”? Well, that was done just after the “107.23 Mbps” wired test. The slower speed was my Android Phone, over 2.4GHz Wifi. Checking my Android Phone it tells me that my Wifi connection to the Router is 72 Mbps. Wifi speed is not only a result of whether you are connected via either the 2.4 GHz or, 5GHz Band but, what other local Wifi devices are ‘talking’ on the same Wifi channel (congestion) as the device doing the test and obstacles like, Brick and Metal. I did this test with minimal other Wifi devices switched on in my home and in the same rom as the Router. So, 107.23 – 72 = 35.23 and so the speed test (www.speedtest.net) result of 33.71 Mbps in the image is kind of to be expected.

My next test was with a device (ChromeBook) connected to my ISPs Router via 5GHz Wifi. It just shows that, if your device has 5GHz Wifi capability then, ensure it is using it, to your Router.

The above image (graph) shows my Speedtest history which is what you can see when you register on https://www.speedtest.net/. It shows that I have done 50 tests since March 2021. The two glitches of below 80 Mbps is when I had a faulty wired device, know as a Network Switch. No problems after replacing that.

My daughter’s TV in her home, was not. When she change the TV’s Wifi settings to use 5 GHz, instead of 2.4 GHz, Netflix (or other Streaming Video service) stopped stuttering and lagging and viewd fine.

Problems, faults and diagnosis

When you lose Internet, there is a lot between you and the World that could go wrong. I won’t cover that here. Just how you can do checks to resolve either your Broadband or, Wifi issues. 'Broadband' and 'Wifi' are not the same thing.

Visual inspections

Check the LAN cable that is between your Router and the Modem that is on your external wall. Look for signs of visual damage. Check if the plugs each end of the LAN cable are securely in both the Modem’s and Router’s sockets. Replace it if you have a spare.
Pets, Humans or, Vacuum Cleaners can have damaged or, knocked out this cable.

Visually check the small thin cable that comes out of the Modem. This is VERY fragile. Gently check it is still plugged in to the Modem. If this is damaged then an engineer may have to visit.

Offcourse, if any plug has a poor connection, you would have no or, intermittent internet connection. Not just slow.

Slow speed

If a recent Speed test shows you have a slower than normal speed to your ISP then, we can look at remedies.

Turn it on and off again!

The old I.T. adage from good ol’ M$ (Microsoft) days. Here though, I am suggesting turning off both the Modem and the Router for 10 seconds. Turn them back on and wait a few minutes for the internet connection again.

This may resolve one or, more things and rectify your slow speed. Electronic devices are sensitive to electrical and radio interference. A momentary electrical spike on your household electricity can cause an issue. Possibly corrupt a setting on the Router. Radio interference can affect the Wifi part of your Router too.

Wifi signal degredation

Broadband is the signal that brings the internet to your home. To the supplied Router. As part of your Broadband package the ISP has to guarantee the speed of your connection.

Wi-Fi is a wireless networking technology that uses radio waves to provide wireless Internet access, from your Router, to your wireless devices. At the time of writing there are 3 bands of frequencies used in the U.K. '2.4 GHZ', '5 GHz' and the new, '6 GHz'.

2.4 GHz band allocation has been around since the 1980's (I think). As devices developed and gained better speeds, the channel availability has shunk down to 3 channels. There is no room for futher speed increases in this band. It is quite congested with local signals.

5 GHz band allocation is better than the old 2.4 GHz and speeds are impressive, allowing for High Definition streaming of online movies, for instance. Not so many localised

ISPs do not guarantee speeds of these wi-fi bands. Signals weaken as they travel through obstacles like, Bricks and Metal. Congestion on a channel also slows speed as each device has to wait to 'talk' on a busy channel. That being said, there are not many Routers proving the new 6 GHz band and it currently allows Vodafone to 'guarantee' good speed or, 'You can cancel your contract'. The Vodafone Pro II package is being bundled with an aditional device, the 'Super wifi 6e Booster'. This in essence, in simple words is, a Access Point or, Repeater. You locate it away from the Router say, to the other side of your property and it ensures the wifi signal does not weaken there.

The available space on the 2.4GHz Wifi band can lead to congestion that, slows your devices connection to the Router. Not only because of too many 2.4GHz devices in your household but, possibly a neighbours too. When the Router is first turned on, it tries to select the quietest 2.4GHz channel. I say quietest but, there may be other devices outside your property that are using the channel too. So, turning off and on as I suggest, may mean that the Router finds a different but, quieter channel. Anyone who experienced CB (Citizen Band) Radio will understand. Also, adjacent channel interference, they called ‘bleed over’.

The 2.4GHz wifi channels can be heaviliy congested locally. These are very localised, low powered signals. However, if you have a lot of devices in your home and neighbouring homes and they are on the same channel, this slows your devices speed down as, it has to wait ‘its’ turn to ‘talk’ to your Router.

The image above shows what I am seeing on the 2.4 GHz channels. My Router is on Channel 6. There are 3 other Routers on that channel but, they are not close enough to cause my devices issues. Note I have a second device, known as a Wifi Access Point (TaurusII-AP), on Channel 1. I'll mention that later. Channel 1 has 2 strong neighbour signals so, I ensured my Router did not use that channel to, avoid a slow speed due to congestion

The primary user of those 2.4 GHz frequencies are Radio Amateurs and they do experiment both digital, television and satelite communications. Suffice to say, in the UK these activities do avoid where ‘2.4 GHz Wifi’ now is located. They use special antennas that point their signals in a particular direction.

The 5 GHz wifi channels are less congested. For the moment. There are more channels available in this band meaning, it is unlikely your neighbour’s Router and devices will cause issue.

The image above shows what I am seeing on the 5 GHz channels. My Router is on Channel 58 with, no other signals near by. Channel 42 looks busy but, the signals are low. Still, for high speed video playback, you'll want to be on the quietest channel.

I installed LAN cable in to my home in the late 1990’s. In the walls to a socket in each room. This was when 2.4 GHz wifi was slow and not so secure, as it is today. It allowed me to have some servers in my home, that could ‘serve’ good quality sound and vision to my devices. I can play my music or, video collection from any device. Say, my AV Reciver in my Living Room to, my TV. My FreeSat box to show good quality online contect. Here, if something goes wrong. I check the LAN cables first and then finally, turn devices on and off to see, if one has failed.

Let's now look at the signal quality from the rear of my property, in the Garden. The first image below is 2.4 GHz and I can tell you that I cannot get good speed from / to my Router on Channel 6. But look at 'TaurusII-AP' on Channel 1. It is stronger than when I was at the front of my property. This is an additional device I installed in a rear bedroom, so that I could use devices in my Shed or, rear Garden. More shortly. The second image show 5 GHz in my rear Garden and that is pretty unusable. I haven't considered an Access Point for 5 GHz yet as, I just want to stream music or, browse Woodworking Plans on the internet.

So, you may have low wi-fi signal the further away your device is from your Router and you are wondering what you can do. You could try moving the Router to a more centralised location in your property. To do this, you would require a longer LAN Cable, between the Modem and the Router. That may still not give you coverage to your rear Garden though. The wi-fi signals are probably getting degraded by a few walls. Even a Hot Water Cylinder.

This is where one or, more devices called Acess Points (or, Repeaters) become advantageous. Giving further coverage to the rear of your property. Two ways that you can set these up. If you are not going to run a LAN Cable between your Router and this AP then, the AP needs to share the same wi-fi Channel that your Router is on. However, that is another device on the chanel that may demand a lot of 'talk' time. The advantage of running a LAN Cable between the router and AP resolve this. Then, the AP can even be on a different channel and elevate congestion on the Router's Channel. This I was able to do because of the LAN wiring I did in all rooms in my Home.

Still slow speed or, no Internet

If a wired speed test still shows slow speed then, it is time to call your Broadband provider and explain the problem and what you have tried. They can then conduct a diagnostic line test. This is the line carrier’s diagnostic tool and should show up any faulty Cable / Fibre or, equipment faults. I am not sure if this test just goes as far as the green cabinet in your street or, up to the supplied (your) Modem. Another test they do is where they can ‘ping’ your Router. A ‘ping’ should solicit a ‘reply’ from your Router. The reply time should be in tens of milliseconds. The above tests can result in a ‘PASS’, even though you are seeing speed issues.

If your ISP does not see a speed issue but, your speed tests clearly do, I would lastly consider if the Router has become faulty. This is difficult for a laymen to decide. Are the usual lights (LEDs) on the front of Modem or, Router lit? Maybe orange, instead of green?

Discuss that with your ISP. They can check their records and decide if a replacement is prudent. These don’t last many years. I cannot guess as, all Router model build quality is not set to a standard where I can predict its lifespan. Experience though is that, the Mains Adaptors supplied with these cheap Routers do become faulty. I personally test the Modem’s or, Router’s Main Adaptor with a Volt Test Meter (DVM) and talk my ISP into replacing the Router.

The ISP supplied the Router and if it is faulty, you’re not going to get the guaranteed speed you once did.

It is now time for you to decide, to ask for an engineer visit. It should be noted that, if the engineer does not find a fault to the Modem then, you could get charged for this engineer’s callout. The engineer is from either BT Openreach or, a third-party and do not check your ISP supplied Router. I only asked for an engineer once. Back when I had ADSL. Which was Broadband over BTs copper telephone wires. The issue turned out to be a connection in a water-logged man-hole in the street.

No resolution?

You have consumer rights to be provided the Broadband speed that they guaranteed. I provide reference material links below about your rights to cancel or, contact the ombudsman, Ofcom to get resolution.

I wrote this article quickly when I saw a social media request for help. It is formed from over 35 years electronics, radio and I.C.T. (Information & Comunication Technology) experience. Do let me know any omissions or if, I can expand further on anything I’ve covered.

References:

Broadband speed tests done via, https://www.speedtest.net/

Broadband Consumer Rights - https://www.moneysupermarket.com/broadband/consumer-rights/

Ofcom and Broadband complaints - https://www.moneysupermarket.com/broadband/consumer-rights/

Acknowledgements

All product and image copyrights acknowledged

Wi-fi signal screenshots taken by Android App, WiFi Analyzer by, olgor.com

Monday, 11 November 2019

Monitor your mdadm RAID Arrays and get E-mail Alerts

You can be using a piece of software for some time and not know of one of it most useful functions. In my Desktop computer I use a software RAID1 to protect me against any data loss. RAID is where you join two or, more Hard Drives into a mirrored array. This basically means that if a drives fails, you don't lose all your data. If you also mirror the Operating system, it results in no or, little downtime.

I have two identically sized SSD (Solid State Drives) and two identically sized hard drives. The SSDs have two identically sized partitions for the Operating System and Boot. I‘d be gutted to be without my PC for too long following a failure.

This article is not about setting up or, configuring my chosen mdadm software raid but, how to get automated alerts if there is degradation. A warning before potential drive failure. I only have found out about getting email alerts recently and until now, manually ran cat /proc/mdstat from time to time.

md0 is my Boot and OS.
md1 is my /home.

media:~$ cat /proc/mdstat
Personalities : [raid1] [linear] [multipath] [raid0] [raid6] [raid5] [raid4] [raid10]
md1 : active raid1 sdb5[3] sdd5[2]
1952405312 blocks super 1.2 [2/2] [UU]

md0 : active raid1 sda1[0]
58091392 blocks super 1.2 [2/1] [UU]

unused devices:

Prerequisites

Before we get started:

  • You have to have an SMTP server that can send the emails from your workstation, to the recipient (i.e. your corporate exchange or Gmail).
  • You have the credentials for a user that is able to send Email on that server (i.e. a mailbox or a Gmail account).

There are a few simple SMTP servers out there. The ssmtp (Simple S.M.T.P) package works well. There are better setup articles but we can quickly set it up.

To install the ssmtp (Simple S.M.T.P) package, use the following command:

sudo apt-get install ssmtp

Using your favourite editor, edit the configuration file:

sudo nano /etc/ssmtp/ssmtp.conf

Edit the following lines. The number after the colon, is the port number used to connect to your email providers SMTP service.

root=username@gmail.com
mailhub=smtp.gmail.com:587
hostname=username@gmail.com
UseSTARTTLS=YES
AuthUser=username
AuthPass=password
FromLineOverride=yes

In order to make the default (root) “from” field be the server name, edit the /etc/ssmtp/revaliases file:

root:machine-name@some-domain.com:smtp.gmail.com

Test the ssmtp setup by sending an Email:

echo "Test message using ssmtp" | sudo ssmtp -vvv your-email@some-domain.com

Configure mdadm

sudo nano /etc/mdadm/mdadm.conf

Just find and edit the following line:

MAILADDR username@gmail.com

Rather than just restart the service, it is best to restart the PC.

You can do a quick test that it is now working

sudo mdadm --monitor --scan --test -1

Monday, 4 February 2019

Buying goods via the internet for a offspring who are in a foreign land

Our son was in Tokyo 2017 to 2018, in his third year of Japanese Studies at Seijo University and we found out how expensive / difficult it was to send gifts to him.  I hope by blogging this, other families will see what options are open to them, no matter the country.

Buying gifts in your country and then sending by international courier is not cheap.  For Christmas we boxed up gifts.  It weighed under 6 kgs but, was so expensive.

There are a lot of ex-pats through out the world so, we expected there to be online site within a country where, you could have UK food and drink delivered.  What we found in fact was that there are UK based online sites but, they were sending from the UK.  So again, expensive P&P!

Easter was coming up so, we wanted to send a few of his favourite foods.  We did do a search of Tokyo based online stores and indeed found some selling UK/western product.  However, when it came to purchasing from the Shopping Cart, we could couldn't set a Tokyo delivery address with a different invoice address.  The invoice address is important as it is used for your card purchase.  We just couldn't set a UK invoice (payment) address.

Finely, I tried www.amazon.jp for Amazon Japan.  You could search for desired destination country in this way.  I did find that I had to create a new Amazon account because, I couldn't log in with my UK account credentials.  I cannot read Japanese so then, before I continued, I set the language to English.

From Japanese


To English

I then set up the security so that the account could only be logged in to with two-factor authentication.  What this means is that, you have your normal username and password but, a text or voice message is sent to your desired mobile / landline telephone number.  The system sends (at no cost) a six-digit code for you to type in.


You then are able to browse the website with item descriptions, Shopping Cart and Payment steps in English. One more thing which, was very important for Japan is, to get the FULL address from the recipient. It was over wise difficult to complete the delivery part of the purchase without the district and postcode entered in the correct order.

I hope this brief article will be of use to someone.

Sunday, 3 February 2019

My TV's HDMI port/s no longer work! Do I throw the TV away?

No! I am not a fan of just throwing something away that, could be resurrected rather than, add to the Worlds WEEE  electronic waste. Replacing the TV could cost hundreds of pounds when, devices exist that cost between £20 and £30 and could give you full functionality of your TV again, bypassing the faulty HDMI video control chip.

I am aiming this article to the everyday TV user not, the electronic geek.  A 'plug n play' solution.  However, some of you might have researched and seen that you can fix electronic devices by, ' using a Hairdryer / Heat Gun on the xxxx chip' or, ' baking the xxxx circuit board in an Oven'.  Let me dissuade you from this please. The resulted 'fix' seldom lasts long and could even fail and you end up with a useless (dead) TV.

The technically savvy would know that you can buy replacement (fully working) circuit boards for around £30 but, I am not aiming this article at those people.  They don't need my help. Also, in this disposable World, it can be hard to find such replacements for an old TV.  For instance, I could not get a replacement board for the LG LCD TV I have that, was manufactured six years ago.  A major grumble of mine and at the time of writing, the EU are proposing law that forces manufacturers to make electronic devices last longer and be more repairable.

Jumping straight to the answer...
Look at the back of your TV and if you see three sockets that say, 'Component Video In' then, buying the following will get you back up and going:-
1 x HDMI to YPbPr RGB Component Converter
1 x Component Video cable
1 x RCA Stereo audio cable


Component YPbPr video will still give you full HD (1080p) quality.  The Component video lead has separate 'Red', 'Green' and 'Blue' connections that carry the video from the converter, to your TVs 'Component Video In' connections.  The RCA Stereo audio cable carries the audio left and right channels from the converter, to your TVs Component audio connections.

If you think that this is just too many unsightly cables, the converter device is small enough to be hidden from view. Even use Velcro to stick it behind the back of your TV and use short cables. No one will notice.


If you don't have an AV Receiver / Amplifier and want to connect multiple HDMI devices to my above solution then you will need to also look at getting a HDMI Switch device. There are many available and can allow anywhere between three and five devices to be connect to a single HDMI output that, would then be connected to the converter mentioned above.

My story in depth

A work colleague gave me an LG 47 inch LED TV featuring 100Hz, 1080p HD and Freeview HD.  He was throwing it away as, the HDMI ports had stopped working.  He just went out and bought a new TV.  Yes, he was probably better paid than me! Thanks Scott!

All my AV devices connected to my Onkyo AV Receiver which has six HDMI inputs and one HDMI output which, I would normally have connected to my TV.  So, I would normally have only one HDMI lead connected to the TV.

For completeness, connected to my AV receiver are:-
Blu-ray player, FreeSat PVR and a DIY Kodi Media Center that I built from an old PC.

Sadly, I could not get a replacement circuit board for the TV so, I looked at other options.  It just bugs me when, an otherwise good device is crippled by the poor manufacture of a single semiconductor chip.

Most modern TVs come with a plethora of connections.  If you look at the back of modern TVs it can be quite daunting.  HDMI is the latest connection that gives you a single socket to connect your full HD (1080p) devices to your TV.  It is by far the most convenient way to plug an AV (Audio – Video) device in to a TV.  Thus, most device manuals don't go in to detail about the 'other' connections (sockets) on your TV.

Before HDMI, Component video (YPBPR) was an alternative and can be found on most A/V Receiver, Blu-ray players, DVD players and LCD video projectors.

Update
After five months use, my Porta died. I contacted the supplier who, were the manufacturer and they sent a replacement. However, it was only the mains adapter that failed. So, I ordered a 5Vdc 3Amp mains adaptor and got the original going again.

Appendix
Below is what I bought and is an example only.  There are other brands out there.
HDMI to YPbPr RGB Component Converter
Component Video RGB YUV 3 Phonos To 3 Phono Cable Lead 50cm 0.5m
Twin RCA Phono to RCA Phono male audio lead 1.5mtr

Wednesday, 14 March 2018

Creating a 1 centimetre squared light grey grid on A4 paper using Inkscape

My wife wanted to draft out a crossword puzzle for her Rainbow Girl Guides unit. She needed a faint 1 centimetre squared grid to plan it out. She would use a pencil and plan the word positions. Finally, tracing over the words with a pen and drawing in required squares.

Inkscape is a free and open-source vector graphics editor, available for Linux, Windows and Mac OS X; it can be used to create or edit vector graphics such as illustrations, diagrams, line arts, charts, logos and complex paintings.

Inkscape has a Grid extension but, it requires that you enter some values in pixels.

So, in my case because I wanted 1 centimetre squares I

<SHIFT> + <CTRL> + <D>

which is the shortcuts keys for

File → Document Properties

I selected A4 and then selected in the 'Units' drop-down 'cm'. I noted down that, an A4 piece of paper was 21 cms width, by 29.7 cms height. I then changed the 'Units' drop-down to 'px' for pixels. This gave me 744.09 pixels width. I then divided 744.09 by 21. Rounding down...

35.43 pixels = 1 centimetres

Noting this down I then went and created the grid.

Extensions (Extras) → Render → Grid

I left the 'Line Width' at 1 pixel. I changed both the 'Horizontal' and 'Vertical' spacings to 35.4 pixels. Clicking on the 'Apply' button results in a visible and printable page with a 1 cms squared grid upon. However, this was in the default Stroke colour, black. I wanted to lighten this so that, it was just a faint background grid layout, for my wife to use. So, I wanted to change it to light grey colour lines.

Having highlighted the grid

<CTRL> + <A>

which is the shortcuts keys for

Edit → Select All

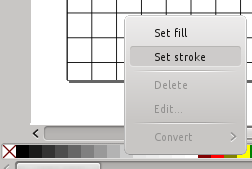
I then right mouse clicked on the '20% grey' colour from the colour pallete which was at the bottom of the editor pane. Offcourse, if I wanted this to be like a school math pages, I could have selected a light blue colour.

Done!

If you do not want to go through all of the above then, you can download my SVG file here,
A4_1cm_square_grid_paper.svg

Friday, 21 July 2017

AWS - How do I redirect HTTP traffic on my server to HTTPS on my Load Balancer?

This article is merely notes for myself just now. I may turn it into a full article if I get any feedback.

I have a AWS (Amazon Web Service) Free Tier trial account and currently experimenting and going through tutorials. I have set up an Elastic Load Balancer to two Apache2 PHP Webservers (HTTPS) with, a MySQL DB Server. I then put a copy of my bespoke PHP pages, searching my music collection database.

AWS - How do I set a Elastic (fixed) IP for the Load Balancer?

I wanted to set a DNS entry for aws.taurus2.co.uk
You cannot set an Elastic IP for the Load Balancer. Instead, set a CNAME in your DNS to the Load Balancers 'DNS Name'.

i.e.

aws CNAME myloadbalancer-1641756311.eu-west-2.elb.amazonaws.com

AWS - How do I redirect HTTP traffic on my webserver to HTTPS on my Load Balancer?

Next, I wanted to redirect HTTP traffic on my webservers to HTTPS on the Load Balancer.

sudo nano /etc/apache2/apache2.conf

Add or change in the <Directory /var/www/> section

AllowOverride All
sudo nano /var/www/html/.htaccess
RewriteEngine on RewriteCond %{HTTP:X-Forwarded-Proto} ^http$ RewriteRule .* https://%{HTTP_HOST}%{REQUEST_URI} [R=301,L]

The above tests the X-Forwarded-Proto header and redirects HTTP to HTTPS, without interfering with ELB health check.

sudo service apache2 reload

You can tail your apache access log with the below which, removes any "ELB-HealthChecker" entries which get in the way.

tail -F /var/log/apache2/access.log | grep -v "ELB-HealthChecker"

References:
https://forums.aws.amazon.com/thread.jspa?messageID=745509

Wednesday, 28 June 2017

Arrests in UK over Microsoft scam calls

At least one person I know will be happy to read about this. I had to wipe their PCs drive due to infection which resulted in this attempted scam. I then reinstalled M$ Windows with all the latest security patches. Thankfully, I was able to recover all their person files first.

Their PC got infected and a pop-up screen of some sort indicated a problem and to call the given 'Microsoft Support' telephone number. Although realising it was a scam, they then received numerous telephone calls, trying to get them to part with money to fix the PC remotely.

BBC News - Arrests in UK over Microsoft scam calls

How to see Debian/Ubuntu Security advisories and receive email alerts

Security advisories are published by leading Linux O.S. distributors, announcing important security patches that should be applied as a matter of urgency to safeguard a particular piece of software and ultimately, safeguard your Linux Operating System.

Different Linux flavours can be set up to automatically email a notification to you. You can also set up automated security patching. I will show you how below.

Below are several links to visit for Security advisory notices and details.

http://www.linuxsecurity.com/content/section/3/170/ - Shows Security advisories for several flavours of Linux O.S.

https://www.debian.org/security/ - Shows Security advisories for Debian

https://www.ubuntu.com/usn/ - Shows Security advisories for Ubuntu

Prerequisites

Before we get started:

  • You have to have an SMTP server that can send the emails from your workstation, to the recipient (i.e. your corporate exchange or Gmail).
  • You have the credentials for a user that is able to send Email on that server (i.e. a mailbox or a Gmail account).

There are a few simple SMTP servers out there. The ssmtp (Simple S.M.T.P) package works well. There are better setup articles but we can quickly set it up.

To install the ssmtp (Simple S.M.T.P) package, use the following command:

sudo apt-get install ssmtp

Using your favourite editor, edit the configuration file:

sudo nano /etc/ssmtp/ssmtp.conf

Edit the following lines. The number after the colon, is the port number used to connect to your email providers SMTP service.

root=username@gmail.com
mailhub=smtp.gmail.com:587
hostname=username@gmail.com
UseSTARTTLS=YES
AuthUser=username
AuthPass=password
FromLineOverride=yes

In order to make the default (root) “from” field be the server name, edit the /etc/ssmtp/revaliases file:

root:machine-name@some-domain.com:smtp.gmail.com

Test the ssmtp setup by sending an Email:

echo "Test message using ssmtp" | sudo ssmtp -vvv your-email@some-domain.com

Security Update email alerts for Debian/Ubuntu

Apticron is a simple script which sends daily emails about pending package updates such as security updates.

sudo apt-get install apticron

Configure Apticron

sudo nano /etc/apticron/apticron.conf

Edit the following line, ‘EMAIL=’ changing it to your email address

# apticron.conf
#
# set EMAIL to a space separated list of addresses which will be notified of
# impending updates
#
EMAIL="root"
[...]

You will now receive an email alert once a day if, there are any security advisories.

Automatic Security Updates

To check if your Debian / Ubuntu system has Automatic Security Updates installed, you can manually run it with verbose.

sudo apt-get update
sudo unattended-upgrades -v

If this gives an error then, it is not installed so execute
sudo dpkg-reconfigure --priority=low unattended-upgrades

Once installed, check
cat /etc/apt/apt.conf.d/20auto-upgrades

This should result in
APT::Periodic::Update-Package-Lists "1";
APT::Periodic::Unattended-Upgrade "1";

If not, edit the file and set APT::Periodic::Unattended-Upgrade to "1".

References:
https://help.ubuntu.com/community/AutomaticSecurityUpdates
https://www.quora.com/How-can-I-get-email-alerts-for-Linux-security-patches-mainly-Ubuntu-CentOS
http://www.linuxsecurity.com/content/section/3/170/
https://www.debian.org/security/
https://www.ubuntu.com/usn/

'Vaccine' created for yesterdays Petya (NotPetya) Ransomware attack

This latest ransomware attack will encrypt your Windows files and demand a ransom to have your files restored. Researchers have found a way to vaccinate against this virus if, you have not already been infected.

BBC News article

How to Enable the NotPetya/Petna/Petya Vaccine

For my friends and family, your best bet is to download the following file from the link below. Then go to your 'Downloads' folder. Run the nopetyavac’ or, ‘nopetyavac.bat’ file by clicking your right mouse button on the file and selecting, ‘Run as Administrator’. It will create the necessary vaccine file.

Any problems, drop me a message. This needs to be done on all M$ Windows PCs/Laptops that you own.

Click here to download https://download.bleepingcomputer.com/bats/nopetyavac.bat

Anyone wishing to not use the above file and also wish to learn a bit more about this virus visit,

https://www.bleepingcomputer.com/news/security/vaccine-not-killswitch-found-for-petya-notpetya-ransomware-outbreak/

Monday, 29 May 2017

Trying to mount a Windows NTFS HDD on linux errors, "The disk contains an unclean file system"

I had a friend ask me to copy files from her old dying laptop of a spec that was only suitable for Windows XP. She had upgraded it to Windows 8.1 and it was struggling. She got hold of a newer laptop and wanted me to copy her files across.

Being the always cautious techie, I took the old HDD out and tried mounting it on my Ubuntu 14.04LTS, to virus and Rootkit scan it first, before backing up her files. The HDD would not mount and error with:

"The disk contains an unclean file system...."

A bit of research concluded that the Windows 8.1 system was probably set for Fast Startup.

How to disable or enable Fast Startup in Windows 8.1

I started the old laptop in Safe Mode and navigated to the Control Panel to 'Power Options' -> 'System Settings' -> 'Advanced'. I then unticked the box, 'Turn on fast startup (recommended)' thus disabling Fast Startup. Then, shutdown the laptop.

I was then able to mount the drive and access her files.

How to protect your Samba from the latest ransomware SambaCry Vulnerability (CVE-2017-7494)

In May 2017 systems worldwide were hit by the WannaCry ransomware. If you get infected then, then your personal files will be encrypted and a pop up message appears to say that you must pay a ransom (usually BitCoins) or, risk losing your precious files. If you have backed up your files recently then, congratulations. Wipe and reinstall your infected PC / system and recover your backups. If you didn't back up recently, too bad. You don't expect the criminals to really give you your files back after paying the (first) ransom do you!?

Stay ahead of the criminals and ensure your PC / systems are security patched automatically, before you get hit by the latest flavour of virus / ransomware.

Below are link and tips on how to protect yourself against WannaCry 2017.

Debian / Ubuntu

Well, if you have set up automatic security updates on your Debian or, Ubuntu as I mentioned in my Dirty COW exploit and Automatic Security Updates article then, you're already fixed for this exploit.

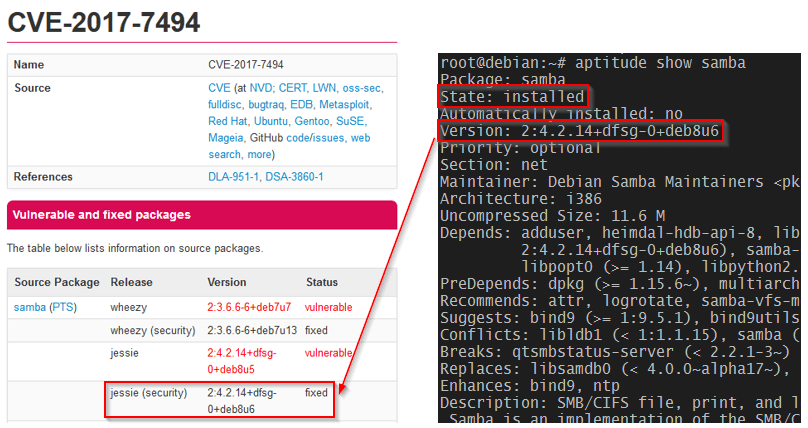
Whether you just want to check that you've patched or, want to patch your systems yourself, head over to the Tecmint article, How to Fix SambaCry Vulnerability (CVE-2017-7494) in Linux Systems.

In a nutshell

Check if you are already patched.

aptitude show samba


Image from tecmint.com

Visit my blog page above and configure your Debian / Ubuntu system to automatically install security updates.

Windows

Check out BitDefender's article, WannaCry wreaks havoc. How to keep your business safe.

In a nutshell

Visit, Microsoft Security Bulletin MS17-010 - Critical and ensure you download and patch your Window's version. Configure your Windows systems to automatically install Security Updates.

Saturday, 22 October 2016

Dirty COW exploit and Automatic Security Updates

The announcement this week of the Dirty COW (CVE-2016-5195), a privilege escalation vulnerability in the Linux Kernel reminded me to check my Ubuntu systems to ensure I had Automatic Security Updates activated.

This ancient bug has came to light now as, there is code in the wild using the vuneralbility that makes patching the Kernel a necessity. Systems that use the Linux OS need patching. This includes Android devices.

My home server and workstation already had Automatic Security Updates activated but, my Kodi Media Center did not.

I first wanted to check if I had been patched
zgrep -ie "\(CVE-2016-2108\|CVE-2016-2107\)" /usr/share/doc/libssl1.0.0/changelog.Debian.gz

Should respond
Debian
* Fix CVE-2016-2107
* Fix CVE-2016-2108

Ubuntu
- debian/patches/CVE-2016-2107.patch: check that there are enough
- CVE-2016-2107
- debian/patches/CVE-2016-2108-1.patch: don't mishandle zero if it is
- debian/patches/CVE-2016-2108-2.patch: fix ASN1_INTEGER handling in
- CVE-2016-2108

If your Android device prompts you for a System Update, don't ignore it, run it.

Automatic Security Updates
To check if your Debian / Ubuntu system has Automatic Security Updates is installed, you can manually run it with verbose.
sudo apt-get update
sudo unattended-upgrades -v

If this gives an error then, it is not installed so execute
sudo dpkg-reconfigure --priority=low unattended-upgrades

Once installed, check that
cat /etc/apt/apt.conf.d/20auto-upgrades

This should result in
APT::Periodic::Update-Package-Lists "1";
APT::Periodic::Unattended-Upgrade "1";

If not, edit the file and set APT::Periodic::Unattended-Upgrade to "1".

References:
https://dirtycow.ninja/
https://help.ubuntu.com/community/AutomaticSecurityUpdates

Saturday, 25 June 2016

Using sed to search and replace text in files within a directory

I needed to edit all files within a directory, replacing an ip address '10.0.7.52' with 'localhost'.

sed is a very powerful command line tool. All the help web pages look intimidating so, it took me a long time to appreciate and understand the basics of it.

The basic usage is:
sed [options] commands [file-to-edit]


I used:
sed -i -e 's/10\.0\.7\.52/localhost/g' *


-i option is used to edit in place on filename.

-e option indicates a command to run.

s is the command used to replace the found expression "10.0.7.52" with "localhost". The command and the two 'words' are separated by forward slashes.

g stands for "global", meaning to do this for the whole line. If you leave off the g and "10.0.7.52" appears twice on the same line, only the first "10.0.7.52" is changed to "localhost".

The backslashes are to escape the following character (the dot) otherwise, it would be interpreted as wildcard for a single character and not, as a dot in the ip address.

Finally, the asterisk states to run this on all files in the current directory.

Removing columns in a csv file

Sometimes I get supplied a large comma separated (.CSV) file from a client with erroneous data columns (fields) in it. Most people would say, open it in M$ Excel, highlight the columns you don't want and delete. What if the file is too large to open in M$ Excel? Well, Linux offers the awk command as the fastest solution.

For example, let's assume you have a comma delimited CSV file in your Home directory called myfile.csv and you want to display the first and third column

awk -F, '{OFS=",";print $1,$3}' < ~/myfile.csv

To actually strip out the first and third column from this file, to another file, you pipe the result.

awk -F, '{OFS=",";print $1,$3}' < ~/myfile.csv > ~/mynewfile.csv


You can select as many columns you would like to keep by, adding its column number, pre-pended with a dollar sign.

awk -F, '{OFS=",";print $1,$3,$4,$6}' < ~/myfile.csv > ~/mynewfile.csv


sfdisk: cannot open /dev/sdb read-write

I have Marius's excelent mdadm Cheat Sheet bookmarked (http://www.ducea.com/2009/03/08/mdadm-cheat-sheet/). Well, it is really a crib sheet. A great reference of mdadm, used to manage and monitor software RAID devices.

However, I had a problem with the following (on kubuntu) when trying to copy the partitions from a current drive (sda), to a new drive (sdb).

sfdisk -d /dev/sda | sfdisk /dev/sdb

/dev/sdb: Permission denied

sfdisk: cannot open /dev/sdb read-write


Simply add 'sudo' to both statements for this to work.

sudo sfdisk -d /dev/sda | sudo sfdisk /dev/sdb


Wednesday, 7 August 2013

The easiest way to split and merge pdf files in linux

I scanned some documents to .pdf format but, I wanted to email them all in one .pdf file.

The easiest way to split, merge or edit pdf files in linux is to use pdftk.

sudo apt-get install pdftk
or
sudo aptitude install pdftk
or
sudo yum install pdftk
depending on what flavour of linux you have.

pdftk is quite powerful but, here are a few examples.

Split a multi-page pdf into separate files:

pdftk largepdfile.pdf burst
results in a number files like 0001.pdf, 0002.pdf, etc.

Merge files into one PDF file:

pdftk *.pdf cat output largepdfile.pdf
or
pdftk file1.pdf file2.pdf file3.pdf cat output largepdfile.pdf

Saturday, 12 January 2013

Converting date formats in a flat-file using Regular expressions

I use two free text editors for preparing flat-files (.csv, etc.) prior to importing into MySQL.

I use Notepad++ in M$ Windows and Kate in Linux.  Both can do Regular expression Search & Replace upon text.

I find regular expressions very useful for preparing date fields prior to import into a database table.  So, converting the UK date format
dd/mm/yyyy (12/01/2013) into a MySQL DATE, DATETIME or, TIMESTAMP datatype (2013-01-12) is easy.

Search:
([0-9]+)/+([0-9]+)/+([0-9]+)


Replace (converts UK date format):
\3-\2-\1

Replace (converts US date format):
\3-\1-\2


So the above UK example searches for dates in the UK date format dd/mm/yyyy and converts them to yyyy-mm-dd.

Before:
Click image to enlarge
After:
Click image to enlarge
Datatypes:
Unlike M$ Excel, these text-editors can cope with large files and do this relatively quickly.

Nice tutorials on Regular expressions at http://www.regular-expressions.info/


Monday, 24 December 2012

Using the Draytek Vigor 2800V after Fibre Broadband (FTTC / VDSL)


The Draytek Vigor 2800V is a ADSL 2 / 2+ (Broadband) Router / Firewall with VPN / VoIP Server capabilities.  Currently you can get these second-hand for about £30-£40.  The Vigor 2800VG also has 802.11g wireless and are about £45-£55 second-hand.

So, you now have Fibre Broadband (FTTC/VDSL) and your old Draytek Vigor 2800V is just a Door stop. Well, at least it can be an expensive Printer Server right? You still want to use it for VoIP (Voice over IP)? Well, you cannot. Not as it stands anyway. Good old Draytek forced the default (World Wide) traffic to go out of the WAN (ADSL) port and no amount of messing about with routing in the Web Configuration Interface is going to solve that.

I found the solution!...

Here are the steps I took to get it working for VoIP. Offcourse, once you have forced a default route into the 2800V, it'll be useful for VPN, etc. again too. I am assuming that you were supplied with a new Router when you got Fibre Broadband.

  1. Make a note of your new Router's IP address. You need this to tell the Vigor 2800V where to route default (World Wide) traffic.

  2. If your old Vigor 2800V still has its old configuration, then you will need to reset it back to Factory Settings. Doing this will ensure that the following steps work and are not circumvented by some custom settings you may have. You can do this by inserting a Pencil into the small hole marked, 'Factory Reset', holding it for about 10 seconds, until, the ACT LED (Light) flashes erratically. Remove the Pencil and the Router will reboot, back to its original set up.

  3. Login into the Vigor 2800V Web Configuration Interface at 192.168.1.1 (Factory set IP address).

  4. Go into the Internet Access > PPPoE / PPPoA window. Disable the PPPoE / PPPoA Client. Click 'OK' and this will reboot your Vigor 2800V.

  5. Having logged back in, goto LAN > General Setup. Under For NAT Usage, set the 1st IP address. This will be the new IP address of the Vigor 2800V on your LAN. Remeber NOT to set it to the same IP address as any other device on your LAN, especially that used by your new Router.

  6. Disable IP Routing Usage. Disable DHCP Server. Assuming that you are using your new Router for DHCP and do NOT want a conflict.

  7. Now, add the IP address/es for the DNS Servers. Your ISP should have provide these. If not, do a Internet search for your ISP and DNS to find these. Otherwise, just enter the IP address of your new Router and hopefully it will resolve DNS fine for you.

  8. Click 'OK' and the Vigor 2800V will reboot itself.

  9. Log back in and at this point you could add your SIP account to VoIP > SIP Accounts but, it still will not work! One more step to fix this.

  10. You now need to Telnet into the Vigor 2800V CLI (Command Line Interface). You can do this in M$ Windows by bringing up a Cmd window or, in a Linux BASH or, my preference, using the PuTTY client application. Telnet your Vigor 2800V's IP address, port 23. If you have not yet set a password, just hit <ENTER>.

  11. Now type the following, ensuring that you put your new Router's IP address where indicated:-

    Code:
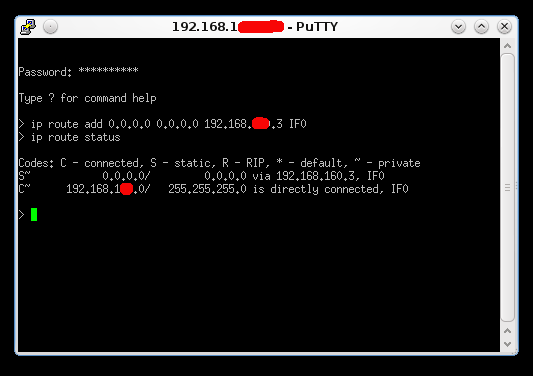
    ip route add 0.0.0.0 0.0.0.0 <New Router's IP address> IF0

    then press <ENTER>.

    Breaking this down, you are setting a default route of 0.0.0.0 with netmask of 0.0.0.0 via your new Router's IP address on the Vigor 2800V's LAN port (IF0).


    In my above example, .3 is my new Router that is connected to the BT FTTC VDSL NTE device.

  12. IF you have not done so in Step 9, set up your VoIP > SIP Accounts and you should now have VoIP again!

You can now also use the VPN Server too but, you will have to either open the required ports on your new Router or, set up as DMZ (demilitarized zone) Host on the new Router.

This solution works for my Vigor 2800V running 2.8.2 firmware.  My New Router is the Technicolor TG582n FTTC.


Sunday, 2 December 2012

Merry Christmas e-card

Being so busy, I cannot be asked to write a Christmas Card list and then write out all those Christmas Cards so, here is a e-Christmas Card I made earlier...


ONN T816 PVR fails to start

Recently, the local mains electrical sub-station failed.  After the power cut and numerous brown-outs my ONN DTR160 PVR (Personal Video Recorder), based upon the Vestel T816, failed to start up.  The display just kept saying, 'Starting...'.

I removed the mains power and removed the cover.  I disconnected the 160Gb EIDE (Western Digital) Hard Drive from its power and IDE connectors.  I switch on the PVR and then shortly got TV channels and 'HDD failure' on the display.  If it had not started then in all likelyhood it would have been the Power Supply.

Finding that the HDD was the failure, I took it out and decided to hook it up to my Linux Kubuntu PC.  If you don't have Linux yourself,  there are Live Linux CD/DVD that you can download and burn to disk.  Booting from these, you have access to a range of tools that I have discussed before on this Blog.

I started GParted (Partition Editor) and selected the last device that was 160GB sized.  This showed two partitions, a small boot and a larger storage partition.  Both of ext2 filetype but the main partition had a Exclamation icon next to it, signifying that the partition was corrupt.  I could at this point have tried to repair the partition with other tools but, as I did not have any programs I wanted to keep, I decided to format the partition.  DO NOT format the smaller boot partition!

Replacing the HDD back into the PVR it started!  I went through the Installation Setup which, formatted the HDD again and I was left with a working PVR again.  :-)


Currently known variations include: Alba ALDTR160 (Argos) • Digihome DTR80 and DTR160 (Argos) • Hitachi HDR082, HDR162, HDR163 & HDR253 (Argos) • Logik LPVR168 (Currys/Dixons) • ONN DTR80 and DTR160 (Asda) • Sharp TU-R162H & TU-R252H • Wharfedale DTR160 HDMI and DTR250 HDMI (Argos) • Wharfedale LP160DTRHDMI and LP250DTRHDMI (Argos)